In my previous blogs, I used a provisioner (Chef Provisioning, Terraform) as an orchestrator to deploy a set of nodes that together form a topology. In this blog, I am doing something slightly different. I’m using CloudFormation to provision individual servers. Each server is told what topology it is part of (e.g. “test1”) and what type of node it is (e.g. “appserver”). Given this information, a Chef recipe pulls the desired configuration for that node type and topology from the Chef server, and sets the node’s runlist, environment and attributes using the ‘chef_node’ resource.
If you’re interested in the twist of using Chef to configure Chef, great! If not, you may still find the CloudFormation template useful. You’d need to modify the init scripts to set your desired runlist and initial node attributes.
This blog assumes you have some familiarity with Chef and AWS. If you don’t, it’s probably not the place to start.
Prepare the Chef infrastructure
You will need access to a Chef Server (e.g. Hosted Chef), with sufficient privileges to create clients, nodes and environments, and upload cookbooks.
Download the topo cookbook and use the ‘example’ directory as your chef repo. Create a .chef directory in the example directory that contains your knife.rb and credentials (.pem file).
Install knife-topo
To define what the nodes in the topology should look like, we’ll use the knife-topo plugin. You can install the plugin using:
chef gem install knife-topo
knife-topo lets you describe a topology in JSON and import it into the Chef Server as a data bag. You can also use the plugin to bootstrap nodes into the topology, but in this case, we’re going to let them pull their own configuration, using the topo cookbook.
Setup the topology JSON
The topology definition for the example looks like this:
{
  "name": "test_default",
  "chef_environment": "test",
  "tags": [ "test" ],
  "nodes": [{
    "name": "appserver01",
    "run_list": [
      "recipe[apt]",
      "recipe[testapp::appserver]",
      "testapp::deploy"
    ],
    "attributes": {
      "topo": {
        "node_type": "appserver"
      },
      "testapp": {
        "user": "ubuntu",
        "path": "/var/opt"
      }
    }
  },
  {
    "name": "dbserver01",
    "run_list": [
      "recipe[apt]",
      "recipe[testapp::db]"
    ],
    "tags": [
      "testapp_database"
    ],
    "attributes": {
      "topo": {
        "node_type": "dbserver"
      }
    }
  }]
}
This JSON describes the default configuration (or ‘blueprint’) for our test topology – in this example, an application server (or multiple application servers) and a database server. The configuration includes runlists, chef environment and node attributes. The JSON is provided in ‘example/test_default.json’.
Upload the example topology and cookbook
Upload the topology to the Chef server:
knife topo import test_default.json
knife topo create test_default
The first command imports the JSON into your workspace, generating any necessary additional artifacts (see knife-topo for more details). The second command creates a data bag item ‘topologies/test_default’ on the Chef Server. It will also create the ‘test’ environment if it does not already exist.
Upload the testapp cookbook and its dependent cookbooks so that they are available from the Chef server:
cd example/testapp
berks install
berks upload
Create a Validation Client and Key
Rather than using the overall organization validation key, we will create a specific client and validation key for use in this example. This means you can easily revoke the key (e.g. by deleting the client) when you are done with this example.
The following command creates a new validation client called ‘example-validator’, and puts its key in your .chef directory.
knife client create example-validator --validator -f .chef/example-validator.pem
Prepare the AWS Environment
You will need an existing VPC. Your user privileges must be sufficient to edit the VPC security groups, setup S3 buckets, IAM roles and EC2 instances.
Setup the S3 Bucket
Create a new S3 bucket (e.g. ‘myorg-key-bucket’) and upload the Chef validation key (e.g. ‘example-validator.pem’) to it. By default, the bucket is private to the owning account.
WARNING: You must determine if a private S3 bucket provides sufficient protection for your validation key. Be aware that other users of the account may be granted access to S3 buckets in general, based on policies associated with them.
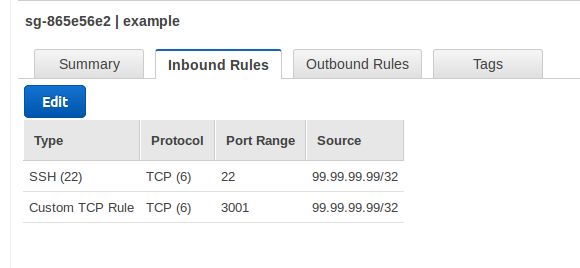
Setup Default Security Group
Access to instances that you create with the CloudFormation template will be subject to the default security group for the VPC they are created in. Edit the default security group for the target VPC so that it includes at least the following rules:
- Inbound SSH from your location – so you can SSH to the instance if needed
- Inbound TCP on port 3001 – so you can connect to the test application
- Outbound to any location – so the chef client can contact the Chef server and download packages (e.g. nodejs, mongodb)
The rules should look similar to the following (with 99.99.99.99 replaced with your external IP address):
Setup A Key Pair
Use the EC2 Key Pairs UI to create a new key pair (e.g. ‘example_key’). Instances that you create with the CloudFormation template will allow SSH connections using this keypair. Place the private key in your ‘~/.ssh’ directory, and use it if you need to SSH to the created instance. You may use an existing keypair instead, if you have one.
Setup Policy and IAM role
Instances that you create with the CloudFormation template will be given the access permissions associated with a predefined ‘test-key-reader’ role (you can change the name of this role). To create the role, first create an IAM access policy that grants access to the key bucket. From the IAM Policies UI:
- Click ‘Create Policy’
- Choose ‘Create Your Own Policy’
- Enter a name such as ‘KeyReaderPolicy’
- Enter the policy details as below, replacing ‘myorg-key-bucket’ with your bucket name
{
    "Version": "2012-10-17",
    "Statement": [
        {
            "Effect": "Allow",
            "Action": [
                "s3:Get*",
                "s3:List*"
            ],
            "Resource": "arn:aws:s3:::myorg-key-bucket/*"
        }
    ]
}
Then, from the IAM Roles UI:
- Click ‘Create New Role’
- Enter a role name such as ‘test-server-role’
- Select the ‘Amazon EC2’ AWS Service Role (Allows EC2 instances to call AWS services on your behalf)
- Select the Policy that you just created (e.g. ‘KeyReaderPolicy’)
- Click ‘Create’
The resulting Role will have the ‘KeyReaderPolicy’ attached to it. You can attach other policies as needed (e.g., if your servers need to be able to register themselves with an elastic load balancer, you can attach a policy to allow this).
Review/modify the example CloudFormation template
The example CloudFormation template is provided for you in ‘example/server.template’. Here’s what it does and how you may need to change it.
Parameters
The parameters let you customize each stack that you create from the template. You may want to change some of the default values, so that you do not have to enter them each time.
"Parameters": {
    "KeyName": {
      "Description": "EC2 keypair to allow access to the instance",
      "Type": "AWS::EC2::KeyPair::KeyName",
      "Default": "example_key",
      "ConstraintDescription": "must be the name of an existing EC2 KeyPair."
    },
The ‘KeyName’ parameter defines the keypair that will be associated with the instance. You may want to change the default if your keypair is named differently.
    "InstanceType": {
      "Description": "Application Server EC2 instance type",
      "Type": "String",
      "Default": "t2.micro",
      "AllowedValues": [
        "t2.micro", "t2.small", "t2.medium", "t2.large"
      ],
      "ConstraintDescription": "must be a valid EC2 instance type."
    },
The ‘InstanceType’ parameter defines what sort and size of instance is provisioned. You can change the set of instance types that are allowed, but make sure that the types you specify here are compatible with the AMIs listed later in the ‘AWSRegionAMI’ mappings. If you include instances with different architectures, you may need to introduce multiple mappings, as in this example.
    "Subnet": {
      "Description": "Subnet where this instance is to be created",
      "Type": "AWS::EC2::Subnet::Id"
    },
The ‘Subnet’ parameter needs to be a subnet in your chosen VPC. You may want to add a default value.
    "Environment": {
      "Description": "Environment - e.g. test, production",
      "Type": "String",
      "Default": "test",
      "AllowedValues": ["test", "production"],
      "ConstraintDescription": "test or production"
    },
The ‘Environment’ parameter is used to choose the correct IAM role and to choose a default topology definition (or ‘blueprint’). Note we have only done the setup for the “test” environment. As you develop your own template, you may want to add extra environments. Make sure there are corresponding roles and topology definitions.
    "TopologyName": {
      "Description": "Topology name",
      "Type": "String",
      "Default": "test1",
      "AllowedPattern" : "[a-zA-Z0-9_\\-]*",
      "ConstraintDescription": "alphanumeric, _ or -"
    },
The ‘TopologyName’ parameter is used to label a set of servers that will work together e.g. to provide a particular deployment of a business system. If there is a topology JSON corresponding to the ‘TopologyName’ parameter, it will be used to configure the nodes. Otherwise, the default topology definition for the Environment will be used.
    "NodeType": {
      "Description": "The purpose of the node to be created (node type in topology JSON)",
      "Type": "String",
      "Default": "appserver",
      "AllowedValues": ["appserver", "dbserver"]
    },
The ‘NodeType’ parameter is used to select the specific configuration details within a topology definition.
    "ChefServerUrl": {
      "Description": "URL for Chef Server",
      "Type": "String",
      "Default": "https://api.opscode.com/organizations/myorg"
    },
The ‘ChefServerUrl’ parameter is used to configure the chef client. Change the default value to be the URL to your Chef Server.
"ClientValidationName": {
"Description": "Name of the Chef client validator",
"Type": "String",
"Default": "example-validator"
},
The ‘ClientValidationName’ parameter is the name of the client validator you created earlier. Change the default if you used a different name.
    "ValidationKeyUrl": {
      "Description": "URL to retrieve client validation key (e.g. from private bucket)",
      "Type": "String",
      "Default": "https://s3-us-west-2.amazonaws.com/myorg-key-bucket/example-validator.pem"
    }
  },
The ‘ValidationKeyUrl’ parameter is the URL to the validation key in your private bucket. You can get this URL from the S3 UI. Select your validation key on the left side of the UI. A link to the URL is provided in the ‘Properties’ tab on the right side.
Mappings
The ‘Mappings’ provide values that can vary based on parameters or other variables.
  "Mappings": {
    "AWSRegionAMI": {
      "us-west-2": {
        "ami": "ami-95b9b5a5"
      },
      "us-east-1": {
        "ami": "ami-7be63d10"
      }
    },
The ‘AWSRegionAMI’ mapping identifies the AMI to use based on AWS region. If you are using a region not listed in the example template, use the EC2 AMI finder and add the appropriate Ubuntu 14.04 AMI supporting HVM (required for t2 instance types) to the ‘AWSRegionAMI’ mapping.
    "EnvMapping": {
      "test" : {
        "iamrole": "test-server-role"
      },
      "production" : {
        "iamrole": "prod-server-role"
      }
    }
  }
The ‘EnvMapping’ mapping identifies the IAM role to use, based on the Environment parameter. If you created an IAM role with a different name or added extra environments, update the ‘EnvMapping’.
Resources
The main section of the template defines the resources to be created. Our template creates a single EC2 Instance resource. We’ll start with its ‘Properties’ and come back to the ‘Metadata’.
Server Properties
  "Resources": {
    "server": {
      "Type": "AWS::EC2::Instance",
      "Metadata" :  { ... },
      "Properties": {
        "KeyName": {
          "Ref": "KeyName"
        },
Assign the keypair specified in the parameters to the instance.
        "IamInstanceProfile" : {
          "Fn::FindInMap": [ "EnvMapping", {
            "Ref": "Environment"
          }, "iamrole" ]
        },
Associate the IAM Role we created earlier with the instance.
        "InstanceType": {
          "Ref": "InstanceType"
        },
        "ImageId": { "Fn::FindInMap": [
          "AWSRegionAMI", {
            "Ref": "AWS::Region"
          },
          "ami"
        ]},
Use the instance type specified in the parameters. Look up the right AMI for the current region using the ‘AWSRegionAMI mapping.
        "Tags": [
          {
            "Key": "Name",
            "Value": {
              "Fn::Join": [
                "",
                [
                  {
                    "Ref": "AWS::StackName"
                  },
                  "-",
                  {
                    "Ref": "Environment"
                  }
                ]
              ]
            }
          }
        ],
Name the instance based on the stack name and environment, e.g. “app01-test”.
        "NetworkInterfaces": [
          {
            "DeleteOnTermination": "true",
            "DeviceIndex": 0,
            "SubnetId": {
              "Ref":  "Subnet"
            },
            "AssociatePublicIpAddress": "true"
          }
        ],
Create the instance in the selected subnet, and assigned a public IP address.
        "UserData": {
          "Fn::Base64": {
            "Fn::Join": ["", [
              "#!/bin/bash\n",
              "echo cloud-init setup now running at $(date -R). | tee /root/output.txt\n",
              "apt-get --assume-yes install python-setuptools\n",
              "easy_install https://s3.amazonaws.com/cloudformation-examples/aws-cfn-bootstrap-latest.tar.gz\n",
              "cfn-init --stack ", { "Ref" : "AWS::StackName" },
              " --region ", { "Ref": "AWS::Region" },
              " --resource server \n",
              "cfn-signal -e $? ",
              " --stack ", { "Ref" : "AWS::StackName" },
              " --region ", { "Ref" : "AWS::Region" },
              " --resource server \n"
            ]]
          }
        }
Initialize the instance by running the bash script specified in ‘UserData’. This script installs and runs ‘cfn-init’, which uses the data in the ‘Metadata’ section to do initial setup. ‘cfn-signal’ is called to report success or failure back to CloudFormation.
Note: An additional service ‘cfn-hup’ is required if you want to be able to update the cfn-init template for an active stack and have it respond to those changes. For an example of this, and an approach to integrating local mode Chef with CloudFormation, see Using Chef with AWS CloudFormation.
      "CreationPolicy" : {
        "ResourceSignal" : {
          "Timeout" : "PT20M"
        }
      }
The server is given a total of 20 minutes to complete its creation, otherwise CloudFormation will timeout and rollback the resource.
CloudFormation Init Metadata
The Cloudformation Init Metadata identifies files to be created and commands to be run as part of setting up the instance.
      "Metadata" :  {
        "AWS::CloudFormation::Init" : {
          "config" : {
            "files" : {
              "/etc/chef/validation.pem" : {
                "source" : { "Ref": "ValidationKeyUrl" },
                "mode"   : "000400",
                "owner"  : "root",
                "group"  : "root",
                "authentication": "S3AccessCreds"
              },
Fetch the Chef validation key from the S3 bucket URL specified in the parameters, using the ‘S3AccessCreds’ credentials specified later.
              "/etc/chef/ohai/hints/ec2.json" : {
                "content" : "{ }",
                "mode"   : "000664",
                "owner"  : "root",
                "group"  : "root"
              },
Create an ‘ec2.json’ hint file, which means Ohai will include ec2 metadata in what it reports back to the Chef Server.
              "/tmp/install.sh" : {
                "source" : "https://www.opscode.com/chef/install.sh",
                "mode"  : "000400",
                "owner" : "root",
                "group" : "root"
              },
Download the Chef ‘install.sh’ bootstrap script.
              "/etc/chef/client.rb" : {
                 "content" : { "Fn::Join": [ "", [
					"log_location STDOUT \n",
					"chef_server_url '",
					{ "Ref": "ChefServerUrl" },
					"'\nvalidation_client_name '",
					{ "Ref": "ClientValidationName" },
					"'\nnode_name '",
                    {
                      "Ref": "AWS::StackName"
                    },
                    "-",
                    {
                      "Ref": "Environment"
                    },
                    "' \n"
                ]]},
                "mode"   : "000644",
                "owner"  : "root",
                "group"  : "root"
              },
Set up a minimal ‘client.rb’ file, using the specified Chef Server URL, the name of the validation client, and a constructed node name.
              "/etc/chef/firstboot.json" : {
                "content" : { "Fn::Join": [ "", [
                  "{ \"topo\": { \"name\": \"",
                  { "Ref": "TopologyName" },
                  "\",\n \"node_type\": \"",
                  { "Ref": "NodeType" },
                  "\",\n \"blueprint_name\": \"",
                  { "Fn::Join": ["",[{ "Ref": "Environment" }, "_default"]] },
                  "\"\n}}\n"
                ]]},
                "mode"   : "000644",
                "owner"  : "root",
                "group"  : "root"
              }
            },
Set up a minimal set of node attributes in the ‘firstboot.json’ file. This consists of the node type, topology name and the blueprint name to be used as a default if no specific topology is found.
            "commands" : {
              "01_install_chef" : {
                "command" : "bash /tmp/install.sh -v 12.5.1"
              },
The first command installs a specific version of the Chef client (12.5.1).
              "02_bootstrap_chef" : {
                "command" : "chef-client -j /etc/chef/firstboot.json -o 'topo::setup_chef_cleanup,topo::setup_node'"
              },
The second command runs the chef-client with the minimal set of node attributes and a runlist that includes the ‘topo::setup_node’ recipe. This recipe loads the topology definition from the Chef server and updates the node on the Chef server with the runlist, attributes and chef environment.
In the second command, chef-client is run with the -o (override runlist) option, so that it does not save the results of the run back to the server. If it did so, it would wipe out the updates that have just been made to the chef node.
The other recipe in the runlist, ‘topo::chef_cleanup’, is optional. It creates a shutdown script that will delete the node from the Chef server when the instance halts. This is useful when creating instances using CloudFormation templates, so that you do not have to clean up the Chef node manually when you delete a CloudFormation stack.
              "03_run_configured_chef" : {
                "command" : "chef-client"
              }
            }
          }
        },
The final command re-runs chef-client, applying the runlist that has just been configured from the topology. After this command completes, the instance is fully set up.
Cloudformation Authentication Metadata
        "AWS::CloudFormation::Authentication" : {
          "S3AccessCreds" : {
            "type" : "S3",
            "roleName" : {
              "Fn::FindInMap": [ "EnvMapping", {
                "Ref": "Environment"
              }, "iamrole" ]
            }
          }
        }
      },
Use the IAM role that we created to allow cfn-init access to the validation key in the S3 bucket.
Create a Stack
Use the CloudFormation UI to upload the template, and create a new stack:
- Click ‘Create New Stack’
- Select ‘Upload a template to Amazon S3’, browse and select your template.
- Give the stack a name (e.g. ‘app01’) and enter any required parameters. Make sure the subnet that you select is in the VPC with the default security group you set up.
- Click ‘Next’. Under ‘Advanced’, you may want to set ‘Rollback on failure’ to ‘No’. This will allow you to logon to the node and debug in the case of errors. Otherwise, the instance will be destroyed on failure.
- Click ‘Next’ and ‘Create’.
When the stack is created, you should see some key details (public IP address, node name and instance ID) in the Outputs tab.
The test application should be available at port 3001 of the instance, e.g. http://xx.xx.xx.xx:3001 where ‘xx.xx.xx.xx’ is the public IP of the instance.
You should also see the node (e.g. ‘app01-test’) in your Chef Server UI. If you look at its run reports, you will see two reports, corresponding to the two chef-client commands in the template.
Common problems
You can SSH to the instance as follows:
ssh -i ~/.ssh/example_key ubuntu@99.99.99.99
Replace 99.99.99.99 with the public IP of the instance (obtain this from the EC2 Instances UI).
Relevant logs are in ‘/var/log’, e.g.,’cfn-init.log’ and ‘cfn-init-cmd.log’.
Missing subnet
Error: ‘CREATE_FAILED’ for the stack with:
Status Reason "Parameter validation failed: parameter value for parameter name Subnet does not exist".
in the UI.
Likely cause: You must select a subnet when you create the stack. Make sure it is in the right VPC.
Access denied to bucket
Error: A 403 Access Denied error in ‘/var/log/cfn-init.log’, similar to:
2015-12-29 21:17:10,319 [ERROR] Error encountered during build of config: Failed to retrieve https://s3-us-west-2.amazonaws.com/myorg-key-bucket/example-validator.pem: HTTP Error 403 : <?xml version="1.0" encoding="UTF-8"?>
<Error><Code>AccessDenied</Code><Message>Access Denied</Message><RequestId>BD0D84BB38AE906B</RequestId><HostId>/gmCYz2QJqbOznq70SfkKRXzXcEut7PEomChbLztHWUgJ/+kUO8NJozoqIejNKUKXh5Z0fb16xc=</HostId></Error>
Likely cause: cfn-init cannot access the validation key – either the S3 URL is incorrect, or there is some problem with the IAM role that has been assigned to the instance.
Bootstrap error
Error: An error in ‘/var/log/cfn-init-cmd.log’, similar to:
2015-12-29 22:15:46,236 P1349 [INFO] Command 02_bootstrap_chef
2015-12-29 22:15:53,643 P1349 [INFO] -----------------------Command Output------
-----------------
<lots of lines>
2015-12-29 22:15:53,645 P1349 [INFO]    [2015-12-29T22:15:53+00:00] INFO: HTTP Request Returned 403 Forbidden: error
2015-12-29 22:15:53,645 P1349 [INFO]    ESC[0m
2015-12-29 22:15:53,645 P1349 [INFO]    ================================================================================ESC[0m
2015-12-29 22:15:53,646 P1349 [INFO]    ESC[31mError executing action `create` on resource 'chef_node[app21-test]'ESC[0m
2015-12-29 22:15:53,646 P1349 [INFO]    ================================================================================ESC[0m
2015-12-29 22:15:53,646 P1349 [INFO]
2015-12-29 22:15:53,646 P1349 [INFO]    ESC[0mNet::HTTPServerExceptionESC[0m
2015-12-29 22:15:53,646 P1349 [INFO]    ------------------------ESC[0m
2015-12-29 22:15:53,646 P1349 [INFO]    403 "Forbidden"ESC[0m
2015-12-29 22:15:53,646 P1349 [INFO]
2015-12-29 22:15:53,646 P1349 [INFO]    ESC[0mResource Declaration:ESC[0m
2015-12-29 22:15:53,646 P1349 [INFO]    ---------------------ESC[0m
2015-12-29 22:15:53,646 P1349 [INFO]    # In /var/chef/cache/cookbooks/topo/recipes/setup_node.rb
2015-12-29 22:15:53,646 P1349 [INFO]    ESC[0m
Likely cause: The chef-client bootstrap has failed. Check that a node and/or client of the same name (‘app21-test’ in the above) does not already exist. If this is not the problem, check the information in /etc/chef/client.rb is correct, that the /etc/chef/validation.pem key exists and is correct for the validation client, that the validation client has permissions to create nodes.
Destroy a Stack
When you are finished with the stack, use the CloudFormation UI to destroy it. When this is finished, the node should have also been deleted from the Chef Server.
More about topologies
If you are interested in using topology definitions, you may be interested in this paper on using declarative data models for configuration, or in the Automate.Insights product for managing Chef configurations (disclaimer – I am Chief Programmer for Automate.Insights).