Getting started with RDF SPARQL queries and inference using Apache Jena Fuseki

This post describes how to get started using the Apache Jena RDF Server (Fuseki) to perform basic SPARQL queries and inference.

Apache Jena is an open-source framework for building semantic web applications. Fuseki is a component of Jena that lets you query an RDF data model using the SPARQL query language.

This post takes you through the steps to set up a Fuseki 2 server, configure it to perform basic inference, and run some SPARQL queries.

This example was inspired by Jörg Baach’s Getting started with Jena, Fuseki and OWL Reasoning.

Set up Fuseki Server

Download and unzip the Fuseki server from the Jena download site. This version used in this post is Fuseki 2.5.0.

In the fuseki directory, run the server:

cd fuseki
./fuseki-server

Browse to http://localhost:3030. You should see the Fuseki server home page, with a green server status in the top right, and with no datasets on it.

Stop the server (CTRL-C).

Configure Datasets

We are going to create the configuration for three datasets, by creating files in fuseki/run/configuration. The three datasets will illustrate:

  • a persisted dataset without inference
  • an in-memory dataset with inference
  • a persisted dataset with inference

Persisted dataset without inference

Create the configuration for a persisted dataset using Jena TDB with no inference enabled, in a file called fuseki/run/configuration/animals_no_inf.ttl. Replace <path> in the dataset section with the path to your fuseki directory:

@prefix :      <http://base/#> .
@prefix tdb:   <http://jena.hpl.hp.com/2008/tdb#> .
@prefix rdf:   <http://www.w3.org/1999/02/22-rdf-syntax-ns#> .
@prefix ja:    <http://jena.hpl.hp.com/2005/11/Assembler#> .
@prefix rdfs:  <http://www.w3.org/2000/01/rdf-schema#> .
@prefix fuseki: <http://jena.apache.org/fuseki#> .

:service1  a                          fuseki:Service ;
        fuseki:dataset                :dataset ;
        fuseki:name                   "animals_no_inf" ;
        fuseki:serviceQuery           "query" , "sparql" ;   # SPARQL query service
        fuseki:serviceReadGraphStore  "get" ;                # Graph store protocol (read only)
        fuseki:serviceReadWriteGraphStore "data" ;           # Graph store protocol (read/write)
        fuseki:serviceUpdate          "update" ;             # SPARQL update service
        fuseki:serviceUpload          "upload" .             # File upload

:dataset
        a             tdb:DatasetTDB ;
        tdb:location  "<path>/fuseki/run/databases/animals_no_inf" .

Lines 1-6 set up some prefixes for schemas used in the definition. Lines 8-15 set up a service to access the dataset supporting SPARQL query and update, as well as file upload. Lines 17-19 declare the dataset and where it should be stored.

Note that the run directory is only created when you start the server. If you skipped starting the server, you will need to create the directories manually.

In-memory dataset with inference

Create an in-memory dataset, with inference in the file fuseki/run/configuration/animals_in_mem.ttl:

@prefix :      <http://base/#> .
@prefix tdb:   <http://jena.hpl.hp.com/2008/tdb#> .
@prefix rdf:   <http://www.w3.org/1999/02/22-rdf-syntax-ns#> .
@prefix ja:    <http://jena.hpl.hp.com/2005/11/Assembler#> .
@prefix rdfs:  <http://www.w3.org/2000/01/rdf-schema#> .
@prefix fuseki: <http://jena.apache.org/fuseki#> .

:service1  a                          fuseki:Service ;
        fuseki:dataset                :dataset ;
        fuseki:name                   "animals_in_mem" ;
        fuseki:serviceQuery           "query" , "sparql" ;
        fuseki:serviceReadGraphStore  "get" ;
        fuseki:serviceReadWriteGraphStore  "data" ;
        fuseki:serviceUpdate          "update" ;
        fuseki:serviceUpload          "upload" .

:dataset  a     ja:RDFDataset ;
  ja:defaultGraph <#model_inf_1> ;
  .

<#model_inf_1> rdfs:label "Inf-1" ;
 ja:reasoner
 [ ja:reasonerURL
 <http://jena.hpl.hp.com/2003/OWLFBRuleReasoner>];
 

Lines 1-15 are as above. Lines 17-19 declare the dataset and a default graph using the inference model, and lines 21-24 set up an inference model using the Jena OWL FB reasoner.

Persisted dataset with inference

Create an TDB (persisted) dataset, with inference in the file fuseki/run/configuration/animals.ttl, replacing <path> with the path to your fuseki directory:

 @prefix :      <http://base/#> .
@prefix tdb:   <http://jena.hpl.hp.com/2008/tdb#> .
@prefix rdf:   <http://www.w3.org/1999/02/22-rdf-syntax-ns#> .
@prefix ja:    <http://jena.hpl.hp.com/2005/11/Assembler#> .
@prefix rdfs:  <http://www.w3.org/2000/01/rdf-schema#> .
@prefix fuseki: <http://jena.apache.org/fuseki#> .

:service_tdb_all  a                   fuseki:Service ;
        fuseki:dataset                :dataset ;
        fuseki:name                   "animals" ;
        fuseki:serviceQuery           "query" , "sparql" ;
        fuseki:serviceReadGraphStore  "get" ;
        fuseki:serviceReadWriteGraphStore "data" ;
        fuseki:serviceUpdate          "update" ;
        fuseki:serviceUpload          "upload" .

:dataset a ja:RDFDataset ;
    ja:defaultGraph       <#model_inf> ;
     .

<#model_inf> a ja:InfModel ;
     ja:baseModel <#graph> ;
     ja:reasoner [
         ja:reasonerURL <http://jena.hpl.hp.com/2003/OWLFBRuleReasoner>
     ] .

<#graph> rdf:type tdb:GraphTDB ;
  tdb:dataset :tdb_dataset_readwrite .

:tdb_dataset_readwrite
        a             tdb:DatasetTDB ;
        tdb:location  "<path>/fuseki/run/databases/animals"
        .

Lines 1-15 are as above. Lines 17-19 declare the dataset and a default graph using the inference model. Lines 21-25 set up an inference model that references a TDB graph. The TDB graph and the dataset in which it is persisted are defined in lines 27-33.

Create datasets

Exit and restart the server. You should see it load the configuration and register the new datasets:

./fuseki-server
...
[2017-03-02 16:56:50] Config     INFO  Load configuration: file:///Users/cdraper/cortex/fuseki2/run/configuration/animals.ttl
[2017-03-02 16:56:51] Config     INFO  Load configuration: file:///Users/cdraper/cortex/fuseki2/run/configuration/animals_in_mem.ttl
[2017-03-02 16:56:51] Config     INFO  Load configuration: file:///Users/cdraper/cortex/fuseki2/run/configuration/animals_no_inf.ttl
[2017-03-02 16:56:51] Config     INFO  Register: /animals
[2017-03-02 16:56:51] Config     INFO  Register: /animals_in_mem
[2017-03-02 16:56:51] Config     INFO  Register: /animals_no_inf

If you get errors, make sure you replaced the <path> correctly in the two persisted dataset configurations.

Refresh the UI at http://localhost:3030. You should now see the three datasets. Click ‘add data’ for the ‘animals_no_inf’ dataset.

We could load data from a file, but we are going to use a query. Go to the query tab. Make sure the dataset dropdown is set to ‘animals_no_inf’.

Change the SPARQL endpoint to: http://localhost:3030/animals_no_inf/update

Paste the insert command into the command area, overwriting anything that is there:

PREFIX rdf:   <http://www.w3.org/1999/02/22-rdf-syntax-ns#>
PREFIX rdfs:   <http://www.w3.org/2000/01/rdf-schema#>
PREFIX ex:   <http://example.org/>
PREFIX zoo:   <http://example.org/zoo/>
PREFIX owl: <http://www.w3.org/2002/07/owl#>

INSERT DATA {
ex:dog1    rdf:type         ex:animal .
ex:cat1    rdf:type         ex:cat .
ex:cat     rdfs:subClassOf  ex:animal .
zoo:host   rdfs:range       ex:animal .
ex:zoo1    zoo:host         ex:cat2 .
ex:cat3    owl:sameAs       ex:cat2 .
}

Lines 1-5 set up some prefixes for schemas used in the insert command. Lines 8-13 are the RDF triples for this example.

Execute the command by clicking on the arrow. You should get a result in the lower part of the UI indicating a successful update.

Repeat for the other datasets by changing the dropdown and using the ‘update’ URL.

Query datasets

In the ‘animals_no_inf’ dataset, change the SPARQL endpoint to: http://localhost:3030/animals_no_inf/sparql and run the following:

PREFIX rdf: <http://www.w3.org/1999/02/22-rdf-syntax-ns#>
PREFIX rdfs: <http://www.w3.org/2000/01/rdf-schema#>
PREFIX ex: <http://example.org/>
SELECT * WHERE {
  ?sub a ex:animal
}
LIMIT 10

You should get a single result ‘ex:dog1’. This is because ‘dog1’ is the only subject explicitly identified as being of type ‘ex:animal’.

Now repeat the query for the ‘animals’ dataset (make sure to use the query URL). You should get the full set of inferred results:

ex:dog1
ex:cat2
ex:cat3
ex:cat1

‘cat2’ is inferred to be an animal because it is the object of a ‘zoo:host’ predicate, and because the objects of this predicate are declared to be of type animal by the ‘rdfs:range’ predicate. ‘cat1’ is inferred to be an animal because it is of type ‘cat’, which is declared to be a subclass of animal. ‘cat3’ is an animal because it is the same as ‘cat1’.

Inference Rules

All of the inference in the above is encoded in tuples that are imported by the OWL reasoner that the ‘animals’ dataset is configured to use.

In the browser, go to the ‘Dataset > Edit’ tab. For the ‘animals_no_inf’ dataset, click on ‘List current graphs’ then click on the default graph. You will see the 6 tuples that we inserted.

Then go to one of the other datasets and repeat. You will see there are over 600 tuples, consisting of the ontology rules being used for the inference.

Using Apache Tinkerpop Gremlin 3 graph API with OrientDB version 2

This post describes how to get started using the Gremlin 3 console with OrientDB version 2.2.

OrientDB is an open-source multi-model database that combines NoSQL documents with a graph database. Apache Tinkerpop is a vendor-neutral graph framework which includes the Gremlin graph API.

OrientDB version 2.2 includes the Gremlin 2 console. Gremlin 3 support is anticipated in OrientDB version 3, but if you want to use Gremlin 3 with OrientDB 2.2, you can do so using the orientdb-gremlin driver. This post takes you through the steps to do that, and touches on some limitations.

Initial Tinkerpop setup

Download and unzip version 3.2.3 (BACKLEVEL) of the Gremlin Console from the Tinkerpop archive. The orientdb-gremlin driver is currently pinned to this backlevel version.

Start the Gremlin console:

cd gremlin
bin/gremlin.sh

If you’re not familiar with Gremlin, you may want to run through the Tinkerpop Getting Started tutorial.

Using built-in in-memory OrientDB graph

We can try out the orientdb-gremlin driver without installing OrientDB. First install the driver in the Gremlin console:

:install com.michaelpollmeier orientdb-gremlin 3.2.3.0
:import org.apache.tinkerpop.gremlin.orientdb.OrientGraphFactory

You should see a long list of imported packages.

The driver is not enabled as a Gremlin console plugin, so you will need to do the :import (but not the :install) whenever you start the console.

Create a connection to an in-memory database.:

g = new OrientGraphFactory("memory:orienttest").getNoTx()

You should see something like:

INFO: OrientDB auto-config DISKCACHE=3,641MB (heap=3,641MB direct=3,641MB os=16,384MB), assuming maximum direct memory size equals to maximum JVM heap size
Apr 02, 2017 10:44:44 AM com.orientechnologies.common.log.OLogManager log
WARNING: MaxDirectMemorySize JVM option is not set or has invalid value, that may cause out of memory errors. Please set the -XX:MaxDirectMemorySize=16384m option when you start the JVM.
==>orientgraph[com.orientechnologies.orient.core.db.document.ODatabaseDocumentTx@6438a7fe]

For now, you can ignore the warning. If you wish to avoid it, use something like the following when you start the Gremlin console:

JAVA_OPTIONS=-XX:MaxDirectMemorySize=2056m bin/gremlin.sh

Create a graph traverser for the database:

t = g.traversal()

and then try creating and querying some vertices and an edge:

v1 = g.addVertex(T.label,'person','name','fred')
v2 = g.addVertex(T.label,'dog','name','fluffy')
v1.addEdge('feeds',v2)

After each command, you should see the identity of the created vertex or edge, for example:

gremlin> v1.addEdge('feeds',v2)
Apr 02, 2017 10:47:50 AM com.orientechnologies.common.log.OLogManager log
INFO: $ANSI{green {db=orienttest}} created class 'E_feeds' as subclass of 'E'
==>e[#41:0][#25:0-feeds->#33:0]

Now run a query to return the dogs fed by Fred:

t.V().hasLabel('person').has('name', 'fred').out('feeds').values('name')

This should return ‘fluffy’ as the answer:

gremlin> t.V().hasLabel('person').has('name', 'fred').out('feeds').values('name')
Apr 02, 2017 10:50:35 AM com.orientechnologies.common.log.OLogManager log
WARNING: $ANSI{green {db=orienttest}} scanning through all elements without using an index for Traversal [OrientGraphStep(vertex,[~label.eq(person), name.eq(fred)]), VertexStep(OUT,[feeds],vertex), PropertiesStep([name],value), NoOpBarrierStep(2500)]
==>fluffy

We will come back to the warning later.

To quit out of the Gremlin console, type :exit. If you are in the Gremlin console and get into a confused state, type :clear to abort the current command.

Using OrientDB Server

Install OrientDB Server

Download and unzip the community edition of OrientDB. Version 2.2.17 was used for this example.

Start the server and assign it a root password:

cd orientdb
bin/server.sh

Start the console:

cd orientdb
bin/console.sh

As I mentioned earlier, this version of OrientDB distributes Gremlin V2 in its bundle. If you are searching for information, note that the OrientDB Gremlin documentation is not directly applicable to our use of Gremlin V3.

Setup OrientDB Database Index

For the example dataset, we need to setup a database and index in advance. Although this may be possible through the Gremlin driver, its semantics is different for different vendors, so I chose to do this directly in the OrientDB console.

In the orientDB console, create a graph database called ‘votes’, using the root password you created earlier:

create database remote:localhost/votes root <rootpwd> plocal

plocal is a storage strategy using multiple local files. An alternative would be to specify memory storage.

You should see something like:

Creating database [remote:localhost/votes] using the storage type [plocal]...
Connecting to database [remote:localhost/votes] with user 'root'...OK
Database created successfully.

Current database is: remote:localhost/votes

We need to create a vertex class and define a property on it so that we can create an index on the ‘userId’ property of the Vote vertices. The class will correspond to a label that we use later in Gremlin queries.

create class V_Vote extends V
create property V_Vote.userId STRING
create index user_index ON V_Vote (userId) UNIQUE

The name of the class used for the vertices needs to correspond to the label that will be used in Gremlin, prefixed with ‘V_’, i.e. the label in Gremlin in this case will be “Vote”. The classes for edges need to be prefixed with ‘E_’.

Although it is possible to define a property and index on the base vertex class (V), the orientdb-gremlin driver will not use this in its traversal strategy.

To list the indexes created on the database:

indexes

You should see a table of indexes including the ‘user_index’ we just created.

Running Gremlin queries which use index

These instructions are based on the ‘Loading Data’ section of the Tinkerpop Getting Started tutorial, modified to work with the orientdb-gremlin driver.

Download the example data:

curl -L -O http://snap.stanford.edu/data/wiki-Vote.txt.gz
gunzip wiki-Vote.txt.gz

Restart the Gremlin console and create a graph traverser for the votes graph:

:import org.apache.tinkerpop.gremlin.orientdb.OrientGraphFactory
g = new OrientGraphFactory("remote:localhost/votes").getNoTx()
t = g.traversal()

Create a helper function that we will use to load data:

getOrCreate = { id ->
  t.V().hasLabel('Vote').has('userId', id).tryNext().orElseGet{ 
    t.addV('userId', id, T.label, 'Vote').next() 
  }
}

In the above, the pattern: g.V().hasLabel().has(, ) is the only one that will cause the orientdb-gremlin driver to use an index. You can see this even with an empty graph. Try:

t.V().has('userId', "1234")

and you will see a warning message like:

Mar 02, 2017 9:37:01 AM com.orientechnologies.common.log.OLogManager log
WARNING: scanning through all elements without using an index for Traversal [OrientGraphStep(vertex,[userId.eq(id)])]

To actually load the data, run the following. You may need to modify the filepath to point to the one you downloaded:

new File('wiki-Vote.txt').eachLine {
  if (!it.startsWith("#")){
    (fromVertex, toVertex) = it.split('\t').collect(getOrCreate)
    fromVertex.addEdge('votesFor', toVertex)
  }
}

This should take 1 to 2 minutes. Without the index, it will take much longer (10x or more), and will output multiple index warnings.

Exploring query behavior

To query the resulting data:

t.V().hasLabel('Vote').count()
t.E().hasLabel('votesFor').count()
t.V().hasLabel('Vote').has('userId', '80').values()

Note that the edge count will take some time. If you ask Gremlin to explain the query:

t.E().hasLabel('votesFor').count().explain()

You will see that the first step of the optimized query still retrieves all of the ‘votesFor’ edges before counting them:

Original Traversal                 [GraphStep(edge,[]), HasStep([~label.eq(votes
                                      For)]), CountGlobalStep]
...
Final Traversal                    [OrientGraphStep(edge,[~label.eq(votesFor)]),
                                       CountGlobalStep]

Contrast this with the explain for the last query:

t.V().hasLabel('Vote').has('userId', '80').values().explain()

This changes the original traversal to two steps, the first returning a specific record using the index:

Original Traversal                 [GraphStep(vertex,[]), HasStep([~label.eq(Vot
                                      e)]), HasStep([userId.eq(80)]), PropertiesSte
                                      p(value)]
...
Final Traversal                    [OrientGraphStep(vertex,[~label.eq(Vote), use
                                      rId.eq(80)]), PropertiesStep(value)]

To perform the equivalent queries from the orientdb console:

select count(*) from V_Vote
select count(*) from E_votesFor
select * from V_Vote where userId=80

These counts return immediately.

Note: Gremlin automatically creates the ‘E_votesFor’ class from the edge name based on the label used when adding the edge.

Using the built-in Gremlin 2 queries in the OrientDB console:

gremlin g.V().count()
gremlin g.E().count()
gremlin g.V().has('userId', 80)

The performance is better with OrientDB’s built-in Gremlin, although the Edge count still takes much longer than the native query. Hopefully the Gremlin 3 support with OrientDB version 3 will be a significant improvement over Gremlin 3 with OrientDB version 2.

Tidbits from creating a Chef Delivery application pipeline

This post contains an assortment of things I learned whilst creating a Chef Delivery pipeline for a nodejs application, presented in no particular order. It’s really the post that never grew up. I’m assuming that you have at least worked through the Chef Delivery tutorial before trying to read this.

First, some overall context

The examples I use in this post come from the Delivery pipeline for a nodejs application with a backend MongoDB database. Build is done with grunt, test with jasmine, deployment with Chef.

We manage a number of application-specific cookbooks in the same git repo as our application code.  These cookbooks and the application code travel down the same delivery pipeline. Other more general cookbooks that we use have their own pipelines. At some point, we might specify these as delivery dependencies for the application pipeline, but we have not yet done so.

Our git repo looks something like this:

.delivery/                 # build cookbook & delivery config
    build-cookbook/
    config.json
cookbooks/                 # our application-specific cookbooks             
public/                    # our client code (javascript)
server/                    # our server code (nodejs)
spec/                      # application unit and func tests (jasmine)
topologies/                # knife-topo JSON files describing deployments
Gruntfile                  # our grunt build scripts

We use delivery-truck to manage the cookbooks through the pipeline. In the Chef Tutorial, delivery-truck is used with a single cookbook repo: it also handles multi-cookbook repos like ours (as long as the cookbooks are in a top-level cookbooks directory).

We wrote our own build cookbook logic (not suprisingly) to manage our application code through the pipeline. In general, that logic consists of (1) what is needed to setup the build tools and (2) a thin wrapper around existing build and test scripts.

An example of one of our phase recipes is the following, for publish:

include_recipe 'build-cookbook::_run_config'
include_recipe 'delivery-truck::publish'
include_recipe 'topology-truck::publish'
include_recipe 'build-cookbook::_publish_app'

The _run_config recipe does some standard setup in each phase.

The delivery_truck::publish recipe looks for any changed cookbooks, and if there are it unloads them to the Chef Server.

The topology-truck cookbook is a work-in-progress that we use to provision and configure our application deployments: its topology-truck::publish recipe looks for changes to the topology JSON files, and if there are any, it uploads them to the Chef Server (as data bag items) using the knife-topo plugin.

The _publish_app recipe packages up the application code, and publishes the package to an internal repository so that it can be used in the later deploy phase.

In this pipeline, we do not literally push to production in the ‘Delivered’ stage. Instead, the output is a build of the application that is ready to be deployed in production. For us, the ‘deploy’ actions in this stage are more a final ‘publish’.

Default recipe – install build tools for use in multiple stages/phases

In each stage, Chef Delivery runs the build cookbook default recipe with superuser privileges, and then runs the specific phase recipe as a specific user (dbuild). The dbuild user has write access to the filesystem in the project workspace, but cannot be used to install globally.

Quite often, there will be some build tools that you either have to install with superuser access, or that it makes sense to install once for use across multiple phases (in which case, you probably do not want to share build nodes across projects). You will need to use the default recipe to setup these tools.

Here’s an example from our default recipe, where we install some prerequisite packages, nodejs and the grunt client:

# include apt as it's important we get up to date git
include_recipe 'apt'

%w(g++ libkrb5-dev make git libfontconfig).each do |pkg|
  package pkg
end

include_recipe 'nodejs::default'

# enable build to run grunt by installing client globally
nodejs_npm 'grunt-cli' do
  name 'grunt-cli'
  version node['automateinsights']['grunt-cli']['version']
end

If you used the above, you would discover that phases can take some considerable time to complete, even if there is no work to be done. What’s going on?

It turns out that the file cache path is being set to a path in the unique workspace for that particular project, stage and phase (e.g. /var/opt/delivery/workspace/33.33.33.11/test/test/mvt/master/acceptance/provision/cache). In each stage and phase the default recipe (via the ark resource) downloads the nodejs package to that unique directory. That can be a lot of slow downloads, even if the correct version of nodejs is already installed.

We prevent this by changing the cache path, for the default recipe only:

# Force cache path to a global path so default recipe downloads
# e.g. nodejs don't get put in each local cache
Chef::Config[:file_cache_path] = '/var/chef/cache'

Phase recipes – beware community cookbooks needing superuser

Most community cookbooks assume they will be run with superuser privileges. You may encounter issues if you try to use them in phase recipes rather than in the default recipe.

For example, we usually use the nodejs_npm resource from the nodejs cookbook to install npm packages for our application. It should be fine to do this in the phase recipe, because we’re installing the npm packages locally. Unfortunately, the nodejs_npm resource always checks whether nodejs is installed by running the install recipe. This action fails without superuser privileges, even if nodejs is already installed.

Basically, you will often end up using the execute resource in the phase recipes e.g.:

repo_path = node['delivery']['workspace']['repo']
build_user = node['delivery_builder']['build_user']

# install test dependencies cannot use nodejs_npm
# because that will try to install nodejs and fail for permissions
execute 'install dependencies' do
  command 'npm install'
  cwd repo_path
  user build_user
end

A little bit of sugar

The delivery-sugar cookbook has some useful helpers for your recipes. Include it in your build cookbook’s metadata.rb to use it.

change.stage is useful if you need conditional logic depending on the stage (e.g. your logic for provision or deploy may vary in Acceptance, Union, Rehearsal, Delivered).

change.changed_cookbooks and change.changed_files are useful if you need logic dependent on what has changed in the commit.

Probably the most useful sugar is with_server_config, illustrated in the next section.

Accessing the Chef Server from phase recipes

The build cookbook recipes are run using chef-client local mode. If you try to do a  node search or access a data bag in the build cookbook recipes, it will not work as you intend. Luckily delivery-sugar can help here, too. The with_server_config command will let you do what you want. It temporarily changes the Chef::Config to point to the Chef Server, and then switches it back to the local context.

Here’s a recipe where we use Chef vault to setup AWS credentials on a build node. The highlighted code executes at compile time in the context of the Chef Server to retrieve the credentials. The rest of the recipe executes in the local context.

# setup credentials to push package to S3
include_recipe 'chef-vault'

root_path = node['delivery']['workspace_path']
aws_dir = File.join(root_path, '.aws')

creds = {}
with_server_config do
  creds = chef_vault_item('test', 'aws_creds')
end
build_user = node['delivery_builder']['build_user']

directory aws_dir do
  owner build_user
  mode '0700'
end

template File.join(aws_dir, 'config') do
  source 'awsconfig.erb'
  owner build_user
  mode '0400'
  variables(
    user: build_user,
    region: node['myapp']['download_bucket_region']
  )
end

template File.join(aws_dir, 'credentials') do
  source 'awscredentials.erb'
  owner build_user
  sensitive true
  mode '0400'
  variables(
    user: build_user,
    access_id: creds['aws_access_key_id'],
    secret_key: creds['aws_secret_access_key']
  )
end

If you want to do something similar to the above using Chef Vault, remember to add the build nodes to the search query for the vault.

Set your own log level

By default, Chef Delivery displays the WARN log level in the output from each phase. You may well want to use a different level.  In your build cookbook, create a recipe e.g. recipes/set_log_level.rb:

# Set config for all runs
Chef::Log.level(node['delivery']['config']['myapp']['log_level'].to_sym)

Set the default log level that you want in the build cookbook in an attribute file, e.g: attributes/default.rb:

default['delivery']['config']['myapp']['log_level'] = :info

Include the set_log_level recipe in all of the phase recipes (unit.rb, lint.rb, syntax.rb, etc) and in the default recipe:

include_recipe 'build-cookbook::set_log_level'
...

You can then override the default value for log level in the .delivery/config.json file:

{
  "version":"2",
  "build_cookbook":{
    "path":".delivery/build-cookbook",
    "name":"build-cookbook"
  },
  "myapp" : {
    "log_level": "debug"
  },
  ...
}

Node attributes available to phase recipes

The following is an example of the node attributes passed into a Delivery build run and thus made available to build cookbook recipes. node['delivery_builder']['build_user'] and node['delivery']['workspace']['repo'] are particularly useful, as is the ability to pass in attributes via the delivery config.json and have them appear under node['delivery']['config'], as shown in the previous section.

{
    "delivery":{
        "workspace_path":"/var/opt/delivery/workspace",
        "workspace":{
            "root":"/var/opt/delivery/workspace/33.33.33.11/test/test/mvt/master/acceptance/provision",
            "chef":"/var/opt/delivery/workspace/33.33.33.11/test/test/mvt/master/acceptance/provision/chef",
            "cache":"/var/opt/delivery/workspace/33.33.33.11/test/test/mvt/master/acceptance/provision/cache",
            "repo":"/var/opt/delivery/workspace/33.33.33.11/test/test/mvt/master/acceptance/provision/repo",
            "ssh_wrapper":"/var/opt/delivery/workspace/33.33.33.11/test/test/mvt/master/acceptance/provision/bin/git_ssh"
        },
        "change":{
            "enterprise":"test",
            "organization":"test",
            "project":"mvt",
            "pipeline":"master",
            "change_id":"590651e5-5c5e-4762-be32-900840ba373f",
            "patchset_number":"latest",
            "stage":"acceptance",
            "phase":"provision",
            "git_url":"ssh://builder@test@33.33.33.11:8989/test/test/mvt",
            "sha":"8403835f4fb718e504a5bffd265afcf640807fcb",
            "patchset_branch":""
        },
        "config":{
                ... as specified in config.json...
        }
    },
    "delivery_builder":{
        "workspace":"/var/opt/delivery/workspace/33.33.33.11/test/test/mvt/master/acceptance/provision",
        "repo":"/var/opt/delivery/workspace/33.33.33.11/test/test/mvt/master/acceptance/provision/repo",
        "cache":"/var/opt/delivery/workspace/33.33.33.11/test/test/mvt/master/acceptance/provision/cache",
        "build_id":"deprecated",
        "build_user":"dbuild"
    }
}


Chef Delivery on a laptop

This post describes how you can run Chef Delivery on a laptop, using Vagrant. My main intent is to give you a way to work through Chef’s Delivery tutorial if you do not have access to AWS – or if you are really lost using a Windows workstation. Use the AWS CloudFormation template in the Tutorial if you can – the approach in this post is more error-prone. You have been warned.

I’m going to assume you are reasonably familiar with Linux, Vagrant and using the knife command – and that you already have Vagrant and Virtualbox installed and working.

We’re going to spin up multiple (at least 4) virtual machines. I’m using an 8-core Ubuntu laptop with 16GB memory. If you are running on something much smaller, good luck.

Plan of Attack

The first part (the bulk) of this post, Setting up Chef Delivery, replaces the Install Chef Delivery on AWS section of the tutorial. In it, we’ll use the delivery-cluster cookbook to provision a Chef Server, Delivery Server and build node as virtual machines using Vagrant.

The second part, Configuring the Workstation, sets up a workspace to use with Chef Delivery. If refers to and partly replaces the second and third sections of the Tutorial.

The final part of this post, Following the Chef Delivery Tutorial gives you some pointers on working through the remaining sections of the Chef Delivery tutorial (the ‘meat’ of the tutorial) using this setup. In particular, the first time you send the demo application through the pipeline, it won’t quite work, due to an interesting ‘chicken and egg’ problem. I’ll explain why and what to do about it when we get there.

Setting up Chef Delivery

Prerequisites

  • Vagrant
  • Virtualbox
  • ChefDK 0.15.5 or more recent (includes Delivery CLI)
  • Git
  • build-essential (Ubuntu) or comparable development library

If you already have ChefDK installed, please check its version and upgrade if needed:

chef --version
 Chef Development Kit Version: 0.15.15
 chef-client version: 12.11.18
 delivery version: 0.0.23 (bf89a6b776b55b89a46bbd57fcaa615c143a09a0)
 berks version: 4.3.5
 kitchen version: 1.10.0

If it’s an earlier version, you may not have the Delivery CLI and you may encounter errors when using delivery-cluster.

You need the development environment library appropriate to your OS, e.g. for Ubuntu:

sudo apt-get install build-essential

(see Chef Delivery docs for other platforms)

Obtain Chef Delivery license

If you do not have a license already, you can obtain a temporary license that will let you use Chef Delivery for the tutorial.

Copy the license into the home directory on your workstation.

cp delivery.license ~

The delivery-cluster cookbook will handle putting the license onto the Delivery Server, once created.

Prepare to provision using delivery-cluster

Clone the delivery-cluster repo from Github:

git clone https://github.com/opscode-cookbooks/delivery-cluster.git ~/delivery-cluster

Run the following from within that repo to generate the provisioning settings to be used:

cd ~/delivery-cluster
rake setup:generate_env

Accept the default of test for Environment Name and Cluster ID.  Change the Driver Name to vagrant:

Global Attributes
Environment Name [test]: 
Cluster ID [test]:

Available Drivers: [ aws | ssh | vagrant ]
Driver Name [aws]: vagrant

Accept the default SSH Username and optionally change the Box Type and Box URL to use Ubuntu (which is what I am using). The default Centos selection should also work.

Driver Information [vagrant]
SSH Username [vagrant]: 
Box Type:  [opscode-centos-6.6]: opscode-ubuntu-14.04
Box URL:  [....]: https://opscode-vm-bento.s3.amazonaws.com/vagrant/virtualbox/opscode_ubuntu-14.04_chef-provisionerless.box

Here’s the Ubuntu Box URL for easier copy/paste:

https://opscode-vm-bento.s3.amazonaws.com/vagrant/virtualbox/opscode_ubuntu-14.04_chef-provisionerless.box

Take the defaults for all other settings. You can see all of the expected settings in the output JSON shown in the next Section.

Be aware this setup is slightly different from the Tutorial – specifically:

  • the IP addresses used for the Chef Server, Delivery Server and build node(s) are ‘33.33.33.xx’ rather than ‘10.0.0.xx’
  • the Delivery Enterprise name is ‘test’ rather than ‘delivery-demo’

The rake command will generate the environment in ~/delivery-cluster/environments/test.json. You can rerun the command or edit the file directly if you need to.

Update the environment to include FQDN

We need to make a manual update to the Delivery environment file to work around an issue  with provisioning Delivery to vagrant.  Without this workaround, various configuration files will incorrectly use an IP address of 10.0.2.15 when trying to communicate with the Chef Server or Delivery Server. To avoid this, we need to specify the FQDN to be used for these servers.

Edit the file ~/delivery-cluster/environments/test.json so that the FQDN is specified:

{
  "name": "test",
  "description": "Delivery Cluster Environment",
  "json_class": "Chef::Environment",
  "chef_type": "environment",
  "override_attributes": {
    "delivery-cluster": {
      "accept_license": true,
      "id": "test",
      "driver": "vagrant",
      "vagrant": {
        "ssh_username": "vagrant",
        "vm_box": "opscode-ubuntu-14.04",
        "image_url": "https://opscode-vm-bento.s3.amazonaws.com/vagrant/virtualbox/opscode_ubuntu-14.04_chef-provisionerless.box",
        "key_file": "/home/test/.vagrant.d/insecure_private_key"
      },
      "chef-server": {
        "fqdn": "33.33.33.10",
        "organization": "test",
        "existing": false,
        "vm_hostname": "chef.example.com",
        "network": ":private_network, {:ip => '33.33.33.10'}",


        "vm_memory": "2048",
        "vm_cpus": "2"
      },
      "delivery": {
        "fqdn": "33.33.33.11",
        "version": "latest",
        "enterprise": "test",
        "license_file": "/home/test/delivery.license",
        "vm_hostname": "delivery.example.com",
        "network": ":private_network, {:ip => '33.33.33.11'}",
        "vm_memory": "2048",
        "vm_cpus": "2",
        "disaster_recovery": {
          "enable": false
        }
      },
      "builders": {
        "count": "1",
        "1": {
         "fqdn": "33.33.33.14",
         "network": ":private_network, {:ip => '33.33.33.14'}",
          "vm_memory": "2048",
          "vm_cpus": "2"
        }
      }
    }
  }
}

Note: It may not be necessary to specify the FQDN for the build node.

Provision the Servers

To start provisioning run:

export CHEF_ENV=test
rake setup:cluster

Watch it for a few minutes, to make sure there’s no early failure. You should see it create a Vagrant machine for the chef server and start to run recipes to install and configure the server.

If it’s going OK, go for coffee. Actually, go for lunch. This will take a while. There’s a lot going on… not only is it installing the Chef Server, Delivery Server and Build node, but also setting up credentials and certificates.

Sometimes a download will timeout and the provisioning run will fail part way through. If this happens, try rerunning it.

Hopefully you will come back and find a successfully completed Chef run. The last node provisioned should have been the build node.

Now we need to make sure it actually worked.  Let’s start by getting the information that will let us logon to the Servers. Run the following rake command:

rake info:delivery_creds
Username: delivery
Password: XSomeGeneratedPassword=
Chef Server URL: https://33.33.33.10/organizations/test

Delivery Server
Created enterprise: test
Admin username: admin
Admin password: +cAnotherGeneratedPasswordg=
Builder Password: UtAndAnotherGeneratedPassword4=
Web login: https://33.33.33.11/e/test/

You should be able to logon to both the Chef Server and the Delivery Server using the URLs and credentials provided by the rake command. You will need to confirm a security exception with the browser, as we’re using self-signed certificates.

If you’re using Firefox and have previously installed Delivery, you may need to clear the old certificates from the browser first. Firefox will give you Error code: SEC_ERROR_REUSED_ISSUER_AND_SERIAL. Go to ‘Preferences > Advanced > Certificates > View Certificates’ in the Firefox menu and delete the entries for 33.33.33.10 from the ‘Server’ and ‘Authorities’ tabs.

For a final smoke test, run the following knife command from within the delivery-cluster repo:

knife node status
build-node-test-1    available

Chef Delivery uses push-jobs, and the above command lists nodes that are visible to push-jobs. If you do not see your build node(s) when you run the command, something has  gone wrong (Chef server certificate problem, incorrect IP address, ….). Double check your environment file and try rerunning the rake command.

If you do make a significant change to the environment settings (e.g. changing the box type), I recommend destroying the virtual machines (see next section) and starting with a fresh clone of delivery-cluster, to remove cached provisioning information.

Managing the virtual machines

The delivery-cluster cookbook creates Vagrant specifications for the virtual machines in ~/delivery-cluster/.chef/vms. From there, you can ssh, halt and start up the VMs, e.g.:

cd ~/delivery-cluster/.chef/vms

ls
build-node-test-1.vm  delivery-server-test.vm      Vagrantfile
chef-server-test.vm   

vagrant halt
...
vagrant up
...
vagrant ssh build-node-test-1
...

Configuring the Workstation

In this section, we’re going to follow the Tutorial section 2 to create a Delivery organization and user.  But we’re going to short-cut a step by first generating an SSH key for the user. This only makes sense because we are both the user and Administrator of Chef Delivery on the workstation: the Tutorial splits the actions because that is more representative of normal use.

Generate an SSH Key for the Chef Delivery User

Generate an ssh key to use in your Chef Delivery user account:

ssh-keygen -t rsa -b 4096 -C "test@example.com"

I recommend saving it to /home/<user>/.ssh/delivery_rsa rather than the default id_rsa file. Do not enter a passphrase (press <Enter> twice when prompted).

Create or append the following in your ~/.ssh/config file, to make sure that the above key is used when communicating with the Delivery git server:

Host 33.33.33.11
        IdentityFile /home/test/.ssh/delivery_rsa
        User test
        IdentitiesOnly yes

test is the name of the user we are going to create in Chef Delivery.

Create an Organization and User

Logon to the Delivery UI at:

https://33.33.33.11/e/test/

using the admin user and password from the rake info:delivery-creds command.

Follow  Tutorial Section 2 to create the ‘delivery-demo’ organization and ‘test’ user. Set the user id to ‘test’ rather than ‘jsmith’. Specify the SSH public key at the same time as creating the user.

Your public key is here:

cat ~/.ssh/delivery_rsa.pub

Once the user is created, verify the setup and create a ‘known hosts’ entry by authenticating to Delivery git server.

ssh -l test@test -p 8989 33.33.33.11

The authenticity of host '[33.33.33.11]:8989 ([33.33.33.11]:8989)' can't be established.
RSA key fingerprint is 11:ce:26:01:b3:ee:f7:7f:4c:e5:ea:a5:91:a6:0d:6a.
Are you sure you want to continue connecting (yes/no)? yes
Warning: Permanently added '[33.33.33.11]:8989' (RSA) to the list of known hosts.
Hi test@test! You've successfully authenticated, but Chef Delivery does not provide shell access.
                 Connection to 33.33.33.11 closed.

If you get ‘Permission denied’, check that you have set the correct public key and user name in Chef Delivery, and the correct key file and user name in the ssh config file. Also check that the private key (~/.ssh/delivery_rsa) is only readable by the user (e.g. mode ‘0600’).

If you’ve previously installed Delivery,  you may get a warning because of a previous ‘known hosts’ entry for 33.33.33.11:

@@@@@@@@@@@@@@@@@@@@@@@@@@@@@@@@@@@@@@@@@@@@@@@@@@@@@@@@@@@
@    WARNING: REMOTE HOST IDENTIFICATION HAS CHANGED!     @
@@@@@@@@@@@@@@@@@@@@@@@@@@@@@@@@@@@@@@@@@@@@@@@@@@@@@@@@@@@
IT IS POSSIBLE THAT SOMEONE IS DOING SOMETHING NASTY!
Someone could be eavesdropping on you right now (man-in-the-middle attack)!
It is also possible that a host key has just been changed.
The fingerprint for the RSA key sent by the remote host is
11:ce:26:01:b3:ee:f7:7f:4c:e5:ea:a5:91:a6:0d:6a.
Please contact your system administrator.
Add correct host key in /home/test/.ssh/known_hosts to get rid of this message.
Offending RSA key in /home/test/.ssh/known_hosts:8
  remove with: ssh-keygen -f "/home/test/.ssh/known_hosts" -R [33.33.33.11]:8989
RSA host key for [33.33.33.11]:8989 has changed and you have requested strict checking.
Host key verification failed.

It is OK to remove the ‘known hosts’ entry using the ssh-keygen command given in the message, because you know you have created a new VM using the same address.

Configure Workstation to use Chef Delivery Server

We’re now going to setup a workspace for Delivery projects:

mkdir -p ~/delivery-demo
cd ~/delivery-demo
delivery setup --ent=test --org=delivery-demo --user=test --server=33.33.33.11

The delivery setup command creates a .delivery/cli.toml file which is used by the delivery CLI whenever it is run in ~/delivery-demo or any subdirectory.

cat ~/delivery-demo/.delivery/cli.toml
 api_protocol = "https"
 enterprise = "test"
 git_port = "8989"
 organization = "delivery-demo"
 pipeline = "master"
 server = "33.33.33.11"
 user = "test"

Create Acceptance Test Node

The last thing we need to do to configure the workstation is create the test node(s) for the demo application. The Tutorial only requires a single test node, in the Acceptance environment. Normally, you would need one or more nodes in each of the Acceptance, Union, Rehearsal and Delivered environments.

Create a Vagrantfile in ~/delivery-demo/Vagrantfile and copy the following into it:

Vagrant.configure('2') do |outer_config|
  outer_config.vm.define "acceptance-test-1" do |config|
    config.vm.network(:private_network, {:ip => '10.0.0.15'})
    config.vm.box = "opscode-ubuntu-14.04"
    config.vm.box_url = "https://opscode-vm-bento.s3.amazonaws.com/vagrant/virtualbox/opscode_ubuntu-14.04_chef-provisionerless.box"
    config.vm.hostname = "acceptance-test-delivery-demo-1"
  end
end

Now use it to start a new Ubuntu VM:

cd ~/delivery-demo
vagrant up

We need to bootstrap this node and register it with the Chef server. The node needs to be in the acceptance environment for the delivery-demo project, which will be named ‘acceptance-test-delivery-demo-awesome_customers_delivery-master’ (acceptance-<enterprise>-<organization>-<project>-<pipeline>) .

cd ~/delivery-cluster
knife environment create acceptance-test-delivery-demo-awesome_customers_delivery-master
knife bootstrap 10.0.0.15 --node-name awesome_customers_delivery-acceptance \
  --environment acceptance-test-delivery-demo-awesome_customers_delivery-master \
  --run-list "recipe[apt],recipe[delivery-base]" -xvagrant -Pvagrant --sudo
knife node run_list set awesome_customers_delivery-acceptance \
  "recipe[apt],recipe[delivery-base],recipe[awesome_customers_delivery]"

We bootstrap using the ‘delivery-base’ recipe, as this will install Chef push-jobs. We then set its runlist to include the ‘awesome_customers_delivery’ cookbook, as that is what we are testing. Note we cannot bootstrap with this recipe because it is not loaded into the Chef Server yet.

Following the Chef Delivery Tutorial

You should now be able to follow the Chef Delivery Tutorial, starting at the fourth section to Create a project.  Go through to the first step of  Step 8 (Deliver the Change) of that Section. In that step, you will watch your project go through the Acceptance Phase and then try to navigate to the application in acceptance test at http://10.0.0.15. It won’t be there.

What went wrong? First, I recommend reading the ‘Learn more about the deployment process’ foldout in Step 8. Then in the Delivery UI, look carefully at the Deploy stage. At the end you will see something like:

Recipe: delivery-truck::deploy
  * delivery_push_job[deploy_awesome_customers_delivery] action dispatch (up to date)

Running handlers:
Running handlers complete
Chef Client finished, 0/1 resources updated in 02 seconds

Basically, the push job that should have run chef-client on the acceptance test node did nothing. Why?

The delivery-truck::deploy recipe searches for nodes in the correct environment, with push-jobs and the project cookbook in their list of recipes.  Specifically, the search term used is "recipes:#{cookbook.name}*". This search term will match against the last-run recipes on the node, NOT against the recipes in the current run-list. When we bootstrapped the acceptance test node, we did not include the awesome_customers_delivery cookbook because it had not been uploaded to the Chef Server yet. The application cookbook was only uploaded in the Publish stage of the Verify phase. This is the ‘chicken-and-egg’ situation I referred to earlier.

To get round this, we will run a one-off manual push-job to converge the node:

cd ~/delivery-cluster
knife job start chef-client awesome_customers_delivery-acceptance

You should now be able to navigate to the application at http://10.0.0.15. Future runs through the pipeline will automatically run the push-job and what you will see in the Acceptance Deploy phase is:

Converging 1 resources
Recipe: delivery-truck::deploy
  * delivery_push_job[deploy_awesome_customers_delivery] action dispatch
    - Dispatch push jobs for chef-client on awesome_customers_delivery-acceptance

Running handlers:
Running handlers complete

Continue with  Step 8 where you click ‘Deliver’ in the Acceptance Stage of the pipeline. You should now be able to finish the remaining sections in the Tutorial.


Deploying a multi-node application using CloudFormation and Chef

In my previous blogs, I used a provisioner (Chef Provisioning, Terraform) as an orchestrator to deploy a set of nodes that together form a topology. In this blog, I am doing something slightly different. I’m using CloudFormation to provision individual servers. Each server is told what topology it is part of (e.g. “test1”) and what type of node it is (e.g. “appserver”). Given this information, a Chef recipe pulls the desired configuration for that node type and topology from the Chef server, and sets the node’s runlist, environment and attributes using the ‘chef_node’ resource.

If you’re interested in the twist of using Chef to configure Chef, great! If not, you may still find the CloudFormation template useful. You’d need to modify the init scripts to set your desired runlist and initial node attributes.

This blog assumes you have some familiarity with Chef and AWS. If you don’t, it’s probably not the place to start.

Prepare the Chef infrastructure

You will need access to a Chef Server (e.g. Hosted Chef), with sufficient privileges to create clients, nodes and environments, and upload cookbooks.

Download the topo cookbook and use the ‘example’ directory as your chef repo. Create a .chef directory in the example directory that contains your knife.rb and credentials (.pem file).

Install knife-topo

To define what the nodes in the topology should look like, we’ll use the knife-topo plugin. You can install the plugin using:

chef gem install knife-topo

knife-topo lets you describe a topology in JSON and import it into the Chef Server as a data bag. You can also use the plugin to bootstrap nodes into the topology, but in this case, we’re going to let them pull their own configuration, using the topo cookbook.

Setup the topology JSON

The topology definition for the example looks like this:

{
  "name": "test_default",
  "chef_environment": "test",
  "tags": [ "test" ],
  "nodes": [{
    "name": "appserver01",
    "run_list": [
      "recipe[apt]",
      "recipe[testapp::appserver]",
      "testapp::deploy"
    ],
    "attributes": {
      "topo": {
        "node_type": "appserver"
      },
      "testapp": {
        "user": "ubuntu",
        "path": "/var/opt"
      }
    }
  },
  {
    "name": "dbserver01",
    "run_list": [
      "recipe[apt]",
      "recipe[testapp::db]"
    ],
    "tags": [
      "testapp_database"
    ],
    "attributes": {
      "topo": {
        "node_type": "dbserver"
      }
    }
  }]
}

This JSON describes the default configuration (or ‘blueprint’) for our test topology – in this example, an application server (or multiple application servers) and a database server. The configuration includes runlists, chef environment and node attributes. The JSON is provided in ‘example/test_default.json’.

Upload the example topology and cookbook

Upload the topology to the Chef server:

knife topo import test_default.json
knife topo create test_default

The first command imports the JSON into your workspace, generating any necessary additional artifacts (see knife-topo for more details). The second command creates a data bag item ‘topologies/test_default’ on the Chef Server. It will also create the ‘test’ environment if it does not already exist.

Upload the testapp cookbook and its dependent cookbooks so that they are available from the Chef server:

cd example/testapp
berks install
berks upload

Create a Validation Client and Key

Rather than using the overall organization validation key, we will create a specific client and validation key for use in this example. This means you can easily revoke the key (e.g. by deleting the client) when you are done with this example.

The following command creates a new validation client called ‘example-validator’, and puts its key in your .chef directory.

knife client create example-validator --validator -f .chef/example-validator.pem

Prepare the AWS Environment

You will need an existing VPC. Your user privileges must be sufficient to edit the VPC security groups, setup S3 buckets, IAM roles and EC2 instances.

Setup the S3 Bucket

Create a new S3 bucket (e.g. ‘myorg-key-bucket’) and upload the Chef validation key (e.g. ‘example-validator.pem’) to it. By default, the bucket is private to the owning account.

WARNING: You must determine if a private S3 bucket provides sufficient protection for your validation key. Be aware that other users of the account may be granted access to S3 buckets in general, based on policies associated with them.

Setup Default Security Group

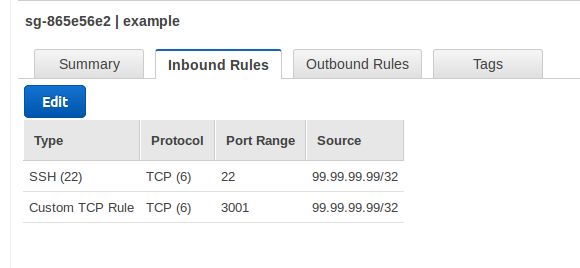
Access to instances that you create with the CloudFormation template will be subject to the default security group for the VPC they are created in. Edit the default security group for the target VPC so that it includes at least the following rules:

  • Inbound SSH from your location – so you can SSH to the instance if needed
  • Inbound TCP on port 3001 – so you can connect to the test application
  • Outbound to any location – so the chef client can contact the Chef server and download packages (e.g. nodejs, mongodb)

The rules should look similar to the following (with 99.99.99.99 replaced with your external IP address):
examplesg

Setup A Key Pair

Use the EC2 Key Pairs UI to create a new key pair (e.g. ‘example_key’). Instances that you create with the CloudFormation template will allow SSH connections using this keypair. Place the private key in your ‘~/.ssh’ directory, and use it if you need to SSH to the created instance. You may use an existing keypair instead, if you have one.

Setup Policy and IAM role

Instances that you create with the CloudFormation template will be given the access permissions associated with a predefined ‘test-key-reader’ role (you can change the name of this role). To create the role, first create an IAM access policy that grants access to the key bucket. From the IAM Policies UI:

  1. Click ‘Create Policy’
  2. Choose ‘Create Your Own Policy’
  3. Enter a name such as ‘KeyReaderPolicy’
  4. Enter the policy details as below, replacing ‘myorg-key-bucket’ with your bucket name
{
    "Version": "2012-10-17",
    "Statement": [
        {
            "Effect": "Allow",
            "Action": [
                "s3:Get*",
                "s3:List*"
            ],
            "Resource": "arn:aws:s3:::myorg-key-bucket/*"
        }
    ]
}

Then, from the IAM Roles UI:

  1. Click ‘Create New Role’
  2. Enter a role name such as ‘test-server-role’
  3. Select the ‘Amazon EC2’ AWS Service Role (Allows EC2 instances to call AWS services on your behalf)
  4. Select the Policy that you just created (e.g. ‘KeyReaderPolicy’)
  5. Click ‘Create’

The resulting Role will have the ‘KeyReaderPolicy’ attached to it. You can attach other policies as needed (e.g., if your servers need to be able to register themselves with an elastic load balancer, you can attach a policy to allow this).

Review/modify the example CloudFormation template

The example CloudFormation template is provided for you in ‘example/server.template’. Here’s what it does and how you may need to change it.

Parameters

The parameters let you customize each stack that you create from the template. You may want to change some of the default values, so that you do not have to enter them each time.

"Parameters": {
    "KeyName": {
      "Description": "EC2 keypair to allow access to the instance",
      "Type": "AWS::EC2::KeyPair::KeyName",
      "Default": "example_key",
      "ConstraintDescription": "must be the name of an existing EC2 KeyPair."
    },

The ‘KeyName’ parameter defines the keypair that will be associated with the instance. You may want to change the default if your keypair is named differently.

    "InstanceType": {
      "Description": "Application Server EC2 instance type",
      "Type": "String",
      "Default": "t2.micro",
      "AllowedValues": [
        "t2.micro", "t2.small", "t2.medium", "t2.large"
      ],
      "ConstraintDescription": "must be a valid EC2 instance type."
    },

The ‘InstanceType’ parameter defines what sort and size of instance is provisioned. You can change the set of instance types that are allowed, but make sure that the types you specify here are compatible with the AMIs listed later in the ‘AWSRegionAMI’ mappings. If you include instances with different architectures, you may need to introduce multiple mappings, as in this example.

    "Subnet": {
      "Description": "Subnet where this instance is to be created",
      "Type": "AWS::EC2::Subnet::Id"
    },

The ‘Subnet’ parameter needs to be a subnet in your chosen VPC. You may want to add a default value.

    "Environment": {
      "Description": "Environment - e.g. test, production",
      "Type": "String",
      "Default": "test",
      "AllowedValues": ["test", "production"],
      "ConstraintDescription": "test or production"
    },

The ‘Environment’ parameter is used to choose the correct IAM role and to choose a default topology definition (or ‘blueprint’). Note we have only done the setup for the “test” environment. As you develop your own template, you may want to add extra environments. Make sure there are corresponding roles and topology definitions.

    "TopologyName": {
      "Description": "Topology name",
      "Type": "String",
      "Default": "test1",
      "AllowedPattern" : "[a-zA-Z0-9_\\-]*",
      "ConstraintDescription": "alphanumeric, _ or -"
    },

The ‘TopologyName’ parameter is used to label a set of servers that will work together e.g. to provide a particular deployment of a business system. If there is a topology JSON corresponding to the ‘TopologyName’ parameter, it will be used to configure the nodes. Otherwise, the default topology definition for the Environment will be used.

        
    "NodeType": {
      "Description": "The purpose of the node to be created (node type in topology JSON)",
      "Type": "String",
      "Default": "appserver",
      "AllowedValues": ["appserver", "dbserver"]
    },

The ‘NodeType’ parameter is used to select the specific configuration details within a topology definition.

    "ChefServerUrl": {
      "Description": "URL for Chef Server",
      "Type": "String",
      "Default": "https://api.opscode.com/organizations/myorg"
    },

The ‘ChefServerUrl’ parameter is used to configure the chef client. Change the default value to be the URL to your Chef Server.

"ClientValidationName": {
"Description": "Name of the Chef client validator",
"Type": "String",
"Default": "example-validator"
},

The ‘ClientValidationName’ parameter is the name of the client validator you created earlier. Change the default if you used a different name.

    
    "ValidationKeyUrl": {
      "Description": "URL to retrieve client validation key (e.g. from private bucket)",
      "Type": "String",
      "Default": "https://s3-us-west-2.amazonaws.com/myorg-key-bucket/example-validator.pem"
    }
  },

The ‘ValidationKeyUrl’ parameter is the URL to the validation key in your private bucket. You can get this URL from the S3 UI. Select your validation key on the left side of the UI. A link to the URL is provided in the ‘Properties’ tab on the right side.

Mappings

The ‘Mappings’ provide values that can vary based on parameters or other variables.

  "Mappings": {
    "AWSRegionAMI": {
      "us-west-2": {
        "ami": "ami-95b9b5a5"
      },
      "us-east-1": {
        "ami": "ami-7be63d10"
      }
    },

The ‘AWSRegionAMI’ mapping identifies the AMI to use based on AWS region. If you are using a region not listed in the example template, use the EC2 AMI finder and add the appropriate Ubuntu 14.04 AMI supporting HVM (required for t2 instance types) to the ‘AWSRegionAMI’ mapping.

    "EnvMapping": {
      "test" : {
        "iamrole": "test-server-role"
      },
      "production" : {
        "iamrole": "prod-server-role"
      }
    }
  }

The ‘EnvMapping’ mapping identifies the IAM role to use, based on the Environment parameter. If you created an IAM role with a different name or added extra environments, update the ‘EnvMapping’.

Resources

The main section of the template defines the resources to be created. Our template creates a single EC2 Instance resource. We’ll start with its ‘Properties’ and come back to the ‘Metadata’.

Server Properties

  "Resources": {
    "server": {
      "Type": "AWS::EC2::Instance",
      "Metadata" :  { ... },
      "Properties": {
        "KeyName": {
          "Ref": "KeyName"
        },

Assign the keypair specified in the parameters to the instance.

        "IamInstanceProfile" : {
          "Fn::FindInMap": [ "EnvMapping", {
            "Ref": "Environment"
          }, "iamrole" ]
        },

Associate the IAM Role we created earlier with the instance.

        "InstanceType": {
          "Ref": "InstanceType"
        },
        "ImageId": { "Fn::FindInMap": [
          "AWSRegionAMI", {
            "Ref": "AWS::Region"
          },
          "ami"
        ]},

Use the instance type specified in the parameters. Look up the right AMI for the current region using the ‘AWSRegionAMI mapping.

        "Tags": [
          {
            "Key": "Name",
            "Value": {
              "Fn::Join": [
                "",
                [
                  {
                    "Ref": "AWS::StackName"
                  },
                  "-",
                  {
                    "Ref": "Environment"
                  }
                ]
              ]
            }
          }
        ],

Name the instance based on the stack name and environment, e.g. “app01-test”.

        "NetworkInterfaces": [
          {
            "DeleteOnTermination": "true",
            "DeviceIndex": 0,
            "SubnetId": {
              "Ref":  "Subnet"
            },
            "AssociatePublicIpAddress": "true"
          }
        ],

Create the instance in the selected subnet, and assigned a public IP address.

        "UserData": {
          "Fn::Base64": {
            "Fn::Join": ["", [
              "#!/bin/bash\n",
              "echo cloud-init setup now running at $(date -R). | tee /root/output.txt\n",
              "apt-get --assume-yes install python-setuptools\n",
              "easy_install https://s3.amazonaws.com/cloudformation-examples/aws-cfn-bootstrap-latest.tar.gz\n",
              "cfn-init --stack ", { "Ref" : "AWS::StackName" },
              " --region ", { "Ref": "AWS::Region" },
              " --resource server \n",
              "cfn-signal -e $? ",
              " --stack ", { "Ref" : "AWS::StackName" },
              " --region ", { "Ref" : "AWS::Region" },
              " --resource server \n"
            ]]
          }
        }

Initialize the instance by running the bash script specified in ‘UserData’. This script installs and runs ‘cfn-init’, which uses the data in the ‘Metadata’ section to do initial setup. ‘cfn-signal’ is called to report success or failure back to CloudFormation.

Note: An additional service ‘cfn-hup’ is required if you want to be able to update the cfn-init template for an active stack and have it respond to those changes. For an example of this, and an approach to integrating local mode Chef with CloudFormation, see Using Chef with AWS CloudFormation.

      "CreationPolicy" : {
        "ResourceSignal" : {
          "Timeout" : "PT20M"
        }
      }

The server is given a total of 20 minutes to complete its creation, otherwise CloudFormation will timeout and rollback the resource.

CloudFormation Init Metadata

The Cloudformation Init Metadata identifies files to be created and commands to be run as part of setting up the instance.

      "Metadata" :  {
        "AWS::CloudFormation::Init" : {
          "config" : {
            "files" : {
              "/etc/chef/validation.pem" : {
                "source" : { "Ref": "ValidationKeyUrl" },
                "mode"   : "000400",
                "owner"  : "root",
                "group"  : "root",
                "authentication": "S3AccessCreds"
              },

Fetch the Chef validation key from the S3 bucket URL specified in the parameters, using the ‘S3AccessCreds’ credentials specified later.

              "/etc/chef/ohai/hints/ec2.json" : {
                "content" : "{ }",
                "mode"   : "000664",
                "owner"  : "root",
                "group"  : "root"
              },

Create an ‘ec2.json’ hint file, which means Ohai will include ec2 metadata in what it reports back to the Chef Server.

              "/tmp/install.sh" : {
                "source" : "https://www.opscode.com/chef/install.sh",
                "mode"  : "000400",
                "owner" : "root",
                "group" : "root"
              },

Download the Chef ‘install.sh’ bootstrap script.

              "/etc/chef/client.rb" : {
                 "content" : { "Fn::Join": [ "", [
					"log_location STDOUT \n",
					"chef_server_url '",
					{ "Ref": "ChefServerUrl" },
					"'\nvalidation_client_name '",
					{ "Ref": "ClientValidationName" },
					"'\nnode_name '",
                    {
                      "Ref": "AWS::StackName"
                    },
                    "-",
                    {
                      "Ref": "Environment"
                    },
                    "' \n"
                ]]},
                "mode"   : "000644",
                "owner"  : "root",
                "group"  : "root"
              },

Set up a minimal ‘client.rb’ file, using the specified Chef Server URL, the name of the validation client, and a constructed node name.

              "/etc/chef/firstboot.json" : {
                "content" : { "Fn::Join": [ "", [
                  "{ \"topo\": { \"name\": \"",
                  { "Ref": "TopologyName" },
                  "\",\n \"node_type\": \"",
                  { "Ref": "NodeType" },
                  "\",\n \"blueprint_name\": \"",
                  { "Fn::Join": ["",[{ "Ref": "Environment" }, "_default"]] },
                  "\"\n}}\n"
                ]]},
                "mode"   : "000644",
                "owner"  : "root",
                "group"  : "root"
              }
            },

Set up a minimal set of node attributes in the ‘firstboot.json’ file. This consists of the node type, topology name and the blueprint name to be used as a default if no specific topology is found.

            "commands" : {
              "01_install_chef" : {
                "command" : "bash /tmp/install.sh -v 12.5.1"
              },

The first command installs a specific version of the Chef client (12.5.1).

              "02_bootstrap_chef" : {
                "command" : "chef-client -j /etc/chef/firstboot.json -o 'topo::setup_chef_cleanup,topo::setup_node'"
              },

The second command runs the chef-client with the minimal set of node attributes and a runlist that includes the ‘topo::setup_node’ recipe. This recipe loads the topology definition from the Chef server and updates the node on the Chef server with the runlist, attributes and chef environment.

In the second command, chef-client is run with the -o (override runlist) option, so that it does not save the results of the run back to the server. If it did so, it would wipe out the updates that have just been made to the chef node.

The other recipe in the runlist, ‘topo::chef_cleanup’, is optional. It creates a shutdown script that will delete the node from the Chef server when the instance halts. This is useful when creating instances using CloudFormation templates, so that you do not have to clean up the Chef node manually when you delete a CloudFormation stack.

              "03_run_configured_chef" : {
                "command" : "chef-client"
              }
            }
          }
        },

The final command re-runs chef-client, applying the runlist that has just been configured from the topology. After this command completes, the instance is fully set up.

Cloudformation Authentication Metadata

        "AWS::CloudFormation::Authentication" : {
          "S3AccessCreds" : {
            "type" : "S3",
            "roleName" : {
              "Fn::FindInMap": [ "EnvMapping", {
                "Ref": "Environment"
              }, "iamrole" ]
            }
          }
        }
      },

Use the IAM role that we created to allow cfn-init access to the validation key in the S3 bucket.

Create a Stack

Use the CloudFormation UI to upload the template, and create a new stack:

  1. Click ‘Create New Stack’
  2. Select ‘Upload a template to Amazon S3’, browse and select your template.
  3. Give the stack a name (e.g. ‘app01’) and enter any required parameters. Make sure the subnet that you select is in the VPC with the default security group you set up.
  4. Click ‘Next’. Under ‘Advanced’, you may want to set ‘Rollback on failure’ to ‘No’. This will allow you to logon to the node and debug in the case of errors. Otherwise, the instance will be destroyed on failure.
  5. Click ‘Next’ and ‘Create’.

When the stack is created, you should see some key details (public IP address, node name and instance ID) in the Outputs tab.

The test application should be available at port 3001 of the instance, e.g. http://xx.xx.xx.xx:3001 where ‘xx.xx.xx.xx’ is the public IP of the instance.

You should also see the node (e.g. ‘app01-test’) in your Chef Server UI. If you look at its run reports, you will see two reports, corresponding to the two chef-client commands in the template.

Common problems

You can SSH to the instance as follows:

ssh -i ~/.ssh/example_key ubuntu@99.99.99.99

Replace 99.99.99.99 with the public IP of the instance (obtain this from the EC2 Instances UI).

Relevant logs are in ‘/var/log’, e.g.,’cfn-init.log’ and ‘cfn-init-cmd.log’.

Missing subnet

Error: ‘CREATE_FAILED’ for the stack with:

Status Reason "Parameter validation failed: parameter value for parameter name Subnet does not exist".

in the UI.

Likely cause: You must select a subnet when you create the stack. Make sure it is in the right VPC.

Access denied to bucket

Error: A 403 Access Denied error in ‘/var/log/cfn-init.log’, similar to:

2015-12-29 21:17:10,319 [ERROR] Error encountered during build of config: Failed to retrieve https://s3-us-west-2.amazonaws.com/myorg-key-bucket/example-validator.pem: HTTP Error 403 : <?xml version="1.0" encoding="UTF-8"?>
<Error><Code>AccessDenied</Code><Message>Access Denied</Message><RequestId>BD0D84BB38AE906B</RequestId><HostId>/gmCYz2QJqbOznq70SfkKRXzXcEut7PEomChbLztHWUgJ/+kUO8NJozoqIejNKUKXh5Z0fb16xc=</HostId></Error>

Likely cause: cfn-init cannot access the validation key – either the S3 URL is incorrect, or there is some problem with the IAM role that has been assigned to the instance.

Bootstrap error

Error: An error in ‘/var/log/cfn-init-cmd.log’, similar to:

2015-12-29 22:15:46,236 P1349 [INFO] Command 02_bootstrap_chef
2015-12-29 22:15:53,643 P1349 [INFO] -----------------------Command Output------
-----------------
<lots of lines>
2015-12-29 22:15:53,645 P1349 [INFO]    [2015-12-29T22:15:53+00:00] INFO: HTTP Request Returned 403 Forbidden: error
2015-12-29 22:15:53,645 P1349 [INFO]    ESC[0m
2015-12-29 22:15:53,645 P1349 [INFO]    ================================================================================ESC[0m
2015-12-29 22:15:53,646 P1349 [INFO]    ESC[31mError executing action `create` on resource 'chef_node[app21-test]'ESC[0m
2015-12-29 22:15:53,646 P1349 [INFO]    ================================================================================ESC[0m
2015-12-29 22:15:53,646 P1349 [INFO]    
2015-12-29 22:15:53,646 P1349 [INFO]    ESC[0mNet::HTTPServerExceptionESC[0m
2015-12-29 22:15:53,646 P1349 [INFO]    ------------------------ESC[0m
2015-12-29 22:15:53,646 P1349 [INFO]    403 "Forbidden"ESC[0m
2015-12-29 22:15:53,646 P1349 [INFO]    
2015-12-29 22:15:53,646 P1349 [INFO]    ESC[0mResource Declaration:ESC[0m
2015-12-29 22:15:53,646 P1349 [INFO]    ---------------------ESC[0m
2015-12-29 22:15:53,646 P1349 [INFO]    # In /var/chef/cache/cookbooks/topo/recipes/setup_node.rb
2015-12-29 22:15:53,646 P1349 [INFO]    ESC[0m

Likely cause: The chef-client bootstrap has failed. Check that a node and/or client of the same name (‘app21-test’ in the above) does not already exist. If this is not the problem, check the information in /etc/chef/client.rb is correct, that the /etc/chef/validation.pem key exists and is correct for the validation client, that the validation client has permissions to create nodes.

Destroy a Stack

When you are finished with the stack, use the CloudFormation UI to destroy it. When this is finished, the node should have also been deleted from the Chef Server.

More about topologies

If you are interested in using topology definitions, you may be interested in this paper on using declarative data models for configuration, or in the Automate.Insights product for managing Chef configurations (disclaimer – I am Chief Programmer for Automate.Insights).

Deploying a multi-node application to AWS using Terraform and Chef

terraform

I’ve been wanting to try out Hashicorp’s Terraform for a while now. So I thought I would repeat the use case in my blog post Deploying a multi-node application to AWS using Chef Provisioning, this time using Terraform for provisioning the instances and Chef to configure the software on the nodes.

Setup AWS access

If you’re familiar with AWS, you need the following:

  • AWS Client installed
  • Default credentials configured in ~.aws/credentials that allow you to create and destroy resources in the region that you will use. I’ll be using us-west-2.
  • A valid key-pair to allow SSH access into the region you will use. I’ll be using a keyname of “test2_aws”
  • Port 3001 open for TCP traffic on the default VPC in the region you will use

If you are less familiar with AWS, follow the instructions in my previous blog post to:

Getting setup with Terraform

Download and install Terraform following the instructions here.

Verify the version you have installed (0.6.3 at time of writing) using:

terraform --version

To see the full set of commands available, enter:

terraform

These commands are documented in the Terraform docs. There is also a decent Getting started guide.

Create a directory that we will do all our work in, and a subdirectory for the Terraform module that we will create:

mkdir -p ~/terra/example
cd ~/terra/example

Creating the AWS Instances

We are going to use Terraform to create two instances in AWS, one which will be our database server, one which will be our application server.

Create a file called ‘example.tf’ in the terra/example directory. This is our terraform configuration file, in which we will define the resources to be created.

example.tf

provider "aws" {
region = "us-west-2"
}

resource "aws_instance" "dbserver" {
instance_type = "t2.micro"
ami = "ami-75f8e245"
key_name = "test2_aws"
}

resource "aws_instance" "appserver" {
instance_type = "t2.micro"
ami = "ami-75f8e245"
key_name = "test2_aws"
associate_public_ip_address = true
}

Lines 1-3 tell Terraform to create the resources using the AWS provider, in the us-west-2 region. Note that in version 0.6.3, region is required and Terraform will not pick up defaults from ~/.aws/config. It will use default credentials in ~/.aws/credentials or from the standard AWS environment variables AWS_ACCESS_KEY_ID and AWS_SECRET_ACCESS_KEY. You can also specify credentials by setting access_key and secret_key properties of the AWS provider in the Terraform configuration file.

Lines 5-9 define an AWS instance which will be our database server, using a t2.micro instance created from an Ubuntu 14.04 AMI, and configured with the default SSH keypair that we created earlier (replace ‘test2_aws’ with your key name if you called it something else). If you are using a different region than us-west-2, you will need to use the EC2 AMI finder to choose the right AMI for your region. Enter your region, ‘trusty’ and ‘hvm:ebs’ to find it (don’t use the ones with io1 or ssd stores).

Lines 11-16 create a second instance which will be our application server. We make sure it will have a public IP address by specifying ‘associate_public_ip_address’.

To get a preview of what Terraform will do with this configuration, run:

terraform plan

You will see output similar to:

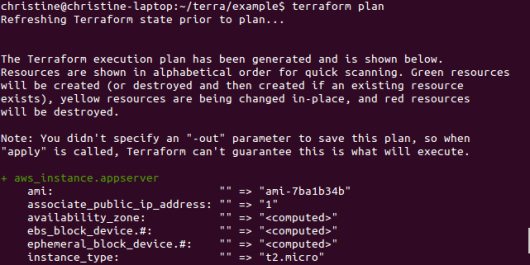
plan1

The plan lists the two instances to be created and the values of the attributes that will be set on them. A value of “<computed>” means that the value will be determined when the resource is created. The end of the plan summarizes how many resources will be added, changed or deleted.

Note that the two resources are listed alphabetically. This is not necessarily the order in which the resources will be created. Terraform calculates this order based on implicit dependencies (we will see an example of this later) and explicit dependencies described using the depends_on resource property. Because there are currently no implicit or explicit dependencies between our resources, Terraform will actually create them in parallel.

To actually apply the plan, run:

terraform apply

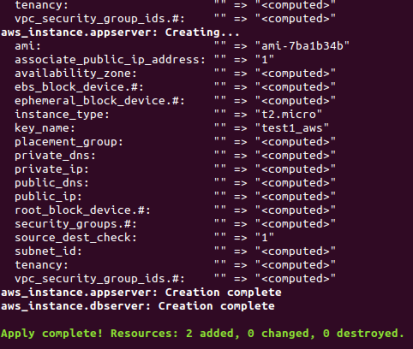
You will see output similar to:
apply1

You should see that the two instances were created in parallel. The output also tells you how many resources were actually added, changed or deleted. It should also tell you where it stored the state of the infrastructure (a .tfstate file). You can use terraform show to review this state.

Terraform uses the state file when you change and reapply the configuration to locate the resources it previously created, so it can update them rather than creating more instances (although for some types of change, such as changing the instance type, it will destroy and recreate the instance). Terraform will refresh the state file from actual AWS state when it creates a plan, so that it does not rely on stale data. For example, if you destroy one of the instances using the EC2 console and then run ‘terraform plan’, it will show you that the instance needs to be created.

We’re now going to destroy the instances, because next we want to add Chef into the picture to act as what Terraform calls a ‘provisioner’. Unfortunately there is currently no way to run a provisioner on an existing resource (unlike in Vagrant, where you can run the ‘vagrant provision’ command), so you will need to destroy the instances whenever you add provisioners or change their configuration.

To destroy the configuration, run:

terraform destroy

You should see confirmation that both instances have been destroyed. Until you’re familiar with Terraform’s behaviors around instance lifecycles, and particularly if you have had any failed apply attempts, I recommend double checking that all instances have been destroyed using the EC2 console.

Setting up Chef

Install Chef DK

We will need the chef client and knife. I will be using ChefDK, which you can download from here here.

Verify it is working by typing:

chef --version

Setup a Hosted Chef account

The Terraform Chef provisioner requires a Chef server, so I am going to use Hosted Chef. You can sign up for a free account here: https://manage.chef.io/signup. Download and unzip the ‘getting started’ package, as we will need the credentials it contains later.

Setup the example application chef repo

We’re going to use the example provided with the knife-topo plugin as our application content.

First, download the latest release of the knife-topo repository and unzip it. Copy the ‘test-repo’ directory into your working directory, e.g.:

cp -R ~/Downloads/knife-topo-1.1.0/test-repo ~/terra

Then copy your knife settings and certificates (e.g.,
the contents of chef-repo/.chef in the “Getting Started” download) into
test-repo/.chef. Verify that you can connect to Hosted Chef by running:

cd ~/terra/test-repo
knife client list

You should see at least one entry for your workstation Chef client.

Upload cookbooks

We need to upload the cookbooks that are used to deploy the example application. To do this, we will use Berkshelf and the Berksfile provided in ‘test-repo’. Run the following commands:

cd ~/terra/test-repo
berks install
berks upload

This will install the remote cookbooks locally in the Berkshelf, then upload them to Hosted Chef.

Deploy the application using Terraform and Chef

Update example.tf

We are now ready to modify our Terraform configuration so that it uses Chef to deploy the application and its dependencies. To do this, we need to add a ‘provisioner’ section to our resources in ‘~/terra/example/example.tf’. Edit the ‘dbserver’ resource as follows, replacing values in angle brackets "" as described below:

resource "aws_instance" "dbserver" {
provisioner "chef" {
server_url = "https://api.opscode.com/organizations/&lt;your-org-name&gt;"
validation_client_name = "&lt;your-client-name&gt;"
validation_key_path = "~/git/chef-repo/.chef/&lt;your-validator-key&gt;.pem"
node_name = "dbserver"
run_list = [ "apt", "testapp::db" ]
connection {
user = "ubuntu"
key_file = "&lt;full-path-to-key&gt;/test2_aws.pem"
agent = false
}
}
instance_type = "t2.micro"
ami = "ami-75f8e245"
key_name = "test2_aws"
}

Lines 2-13 define how to run Chef to setup the node.

Lines 3-5 setup the connection to Hosted Chef, and should correspond to the values in knife.rb, although in knife.rb the validation key path is called ‘validation_key’. Note that if you have ChefDK version 6.2 or greater, you can use your client key (node_name and client_key properties in knife.rb) in place of the organization validator.

Lines 6 and 7 define the name for the node and its runlist.

Lines 8-12 define how to connect to the AWS instance using SSH, in order to bootstrap Chef and perform the chef-client run. The key_file should point to the keypair you created earlier.

Edit the ‘appserver’ resource as follows:

resource "aws_instance" "appserver" {
provisioner "chef" {
server_url = "https://api.opscode.com/organizations/&lt;your-org-name&gt;"
validation_client_name = "&lt;your-client-name&gt;"
validation_key_path = "~/git/chef-repo/.chef/&lt;your-validator-key&gt;.pem"
node_name = "appserver"
run_list = [ "apt", "testapp::appserver", "testapp::deploy" ]
attributes {
"testapp" {
user = "ubuntu"
path = "/var/opt"
db_location = "${aws_instance.dbserver.private_ip}"
}
}
connection {
user = "ubuntu"
key_file = "&lt;full-path-to-key&gt;/test2_aws.pem"
agent = false
}
}
instance_type = "t2.micro"
ami = "ami-75f8e245"
key_name = "test2_aws"
associate_public_ip_address = true
}

For the appserver node, in addition to the runlist we specify a set of initial attributes (lines 8-14). These will be set on the node with ‘normal’ priority. One of those attributes needs to be set dynamically to the IP address of the database server. Terraform allows us to do this using Ruby interpolation syntax and a dot notation to reference the resource property, as shown in line 12. The set of properties that can be accessed like this on an instance are described in the AWS Provider documentation under ‘Attributes Reference’.

The reference we have just created from the appserver resource to the dbserver attribute is an implicit dependency, which will be used by Terraform when determining the order in which it should create the resources.

The final thing we’ll do is output the public IP address of the application server, so we can test our application once it is deployed. Terraform lets us specify both inputs and outputs for a module. Add an output by adding the following to the end of example.tf:

output "address" {
value = "${aws_instance.appserver.public_ip}"
}

Review and apply the change

To review the planned change, run:

cd ~/terra/example
terraform plan

The output will look the same as before, because the resources are listed alphabetically and only show the resources and attributes that are directly handled by Terraform, not those handled by Chef.

Now apply the change:

terraform apply

Unlike previously where the instances were created in parallel, the dbserver instance is created and provisioned using Chef before the appserver instance is created. At the end of a successful apply, you should see something like:

apply2

The public IP address of the application server is listed at the end. You can use this to access the application:

http://:3001/

You should see a “Congratulations!” message and some information about knife-topo.

Failed Terraform applies

If a ‘terraform apply’ fails, it does not automatically rollback. Instead, when you rerun the apply, it will skip any completed resources, and it will destroy partially completed resources before recreating them.

However, Terraform does not invoke any provisioner actions as part of its destroy, so if the fail happens during the provisioner run then the nodes are still registered in Hosted Chef. This will cause the rerun to fail with a message something like:

error

You will need to manually clean up the node and client, as described in the following section.

Review the resource dependency graph

If you want to understand the order in which resources will actually be created, you can review the resource dependency graph:

terraform graph

This will give you output something like:
graph

This tells you that there are three root nodes, for the two AWS instances and the AWS provider. It then tells you that the ‘appserver’ instance is dependent on the ‘dbserver’ instance, and the ‘dbserver’ instance is dependent on the AWS provider. From this, you can deduce that Terraform will setup the AWS provider, then create ‘dbserver’, then create ‘appserver’.

Cleanup the example

To destroy the instances, run:

terraform destroy

This DOES NOT destroy the nodes in Hosted Chef. You need to do this separately, either through the UI or using the knife command:

cd ~/terra/test-repo
knife node destroy dbserver
knife client destroy dbserver
knife node destroy appserver
knife client destroy appserver

Deploying a multi-node application to Vagrant using chef-provisioning

This post is for people who are getting started with chef-provisioning and want to use it to deploy to Vagrant. It will take you through creating a couple of machines and deploying a simple application to them.

You may also be interested in my other post, Deploying a multi-node application to AWS using chef-provisioning.

For an overview of chef-provisioning ( (formerly known as chef-metal), take a look at this Chef-Provisioning: Infrastructure as Code blog post. And see the Chef provisioning docs for more details.

Getting setup with chef-provisioning

Chef-provisioning is included in the latest ChefDK (0.3.6 at time of writing). Make sure you have this version or later installed by typing:

chef --version

If not, you can download or upgrade it here.

Create a new Chef repository to explore chef-provisioning:


cd ~
chef generate repo chefprov

We are going to use chef-client in local mode to run our provisioning recipes, so we want to set up a .chef directory that will be used specifically for this repo.

cd ~/chefprov
mkdir .chef
cd .chef

In the .chef directory, create a knife.rb file containing the following:

log_level                :info
current_dir = File.dirname(__FILE__)
node_name                "provisioner"
client_key               "#{current_dir}/dummy.pem"
validation_client_name   "validator"

Our workstation is going to behave like a chef-client talking to the local-mode server on our workstation, so it needs a node name and a key. The key can be any well-formed key as the local-mode server will not validate it. For example:

ssh-keygen -f ~/chefprov/.chef/dummy.pem

Check the setup is working by performing an empty chef-client run:


cd ~/chefprov
chef-client -z

This will perform a local mode chef-client run with no recipes, using the built-in chef-zero server running on port 8889. You should see output similar to:

Starting Chef Client, version 11.18.0
[2015-01-31T16:16:43-06:00] INFO: *** Chef 11.18.0 ***
[2015-01-31T16:16:43-06:00] INFO: Chef-client pid: 14113
[2015-01-31T16:16:44-06:00] INFO: Run List is []
[2015-01-31T16:16:44-06:00] INFO: Run List expands to []
[2015-01-31T16:16:44-06:00] INFO: Starting Chef Run for provisioner
[2015-01-31T16:16:44-06:00] INFO: Running start handlers
[2015-01-31T16:16:44-06:00] INFO: Start handlers complete.
[2015-01-31T16:16:44-06:00] INFO: HTTP Request Returned 404 Not Found : Object not found: /reports/nodes/provisioner/runs
[2015-01-31T16:16:44-06:00] WARN: Node provisioner has an empty run list.
Converging 0 resources
[2015-01-31T16:16:44-06:00] INFO: Chef Run complete in 0.032696323 seconds
Running handlers:
[2015-01-31T16:16:44-06:00] INFO: Running report handlers
Running handlers complete
[2015-01-31T16:16:44-06:00] INFO: Report handlers complete
Chef Client finished, 0/0 resources updated in 1.117898047 seconds

If you’re curious, take a look at the ‘nodes/provisioner.json’ file. This is where the local-mode server stores its node data. You can also run commands like:

knife node show provisioner -z

This command will query the local-mode server and show summary details that it has about your provisioner node (i.e. your workstation).

Deploy the Application using Vagrant

Get the application cookbooks

The basic application we will install can be found in the ‘test-repo’ for the ‘knife-topo’ plugin on Github. Download the latest release of the knife-topo repository and unzip it. We will use ‘berks vendor’ to assemble the cookbooks we need to deploy this application.

cd knife-topo-0.0.11/test-repo
berks vendor
cp -R berks-cookbooks/* ~/chefprov/cookbooks

Line 2 uses the Berksfile to assemble all of the necessary cookbooks into the ‘berks-cookbooks’ directory. Line 3 copies them into our ‘chefprov’ repo, where the local-mode server will look for them when it runs the chef-provisioning recipes.

Create recipes to provision the machines

Create a recipe to setup the Vagrant environment.

vagrant-setup.rb

require 'chef/provisioning/vagrant_driver'
with_driver 'vagrant'

vagrant_box 'ubuntu64' do
  url 'http://files.vagrantup.com/precise64.box'
end

with_machine_options :vagrant_options => {
  'vm.box' => 'ubuntu64'
}

Line 2 specifies to use the Vagrant driver, which is included in ChefDK.

Lines 4 to 6 create a local Vagrant box called ‘ubuntu64’ using the standard Ubuntu 12.04 box. Lines 8 to 10 tell chef-provisioning to use that box when creating machines.

Use the following recipe to provision the machines:

topo.rb

require 'chef/provisioning'

machine 'db' do
  run_list ['apt','testapp::db']
end

machine 'appserver' do
  run_list ['apt','testapp::appserver']
end

and then run the chef-client to do the provisioning:
chef-client -z vagrant_setup.rb topo.rb

This will create these two machines using Vagrant, bootstrap them and run the specified recipes, installing nodejs on ‘appserver’ and mongodb on ‘db’.

The Vagrant machines by default are stored in “.chef/vms”. You can see their status by going to this directory and running normal vagrant commands, e.g.:


cd ~/chefprov/.chef/vms
vagrant status

You can also use the ‘vagrant global-status’ command to see the status of any VM on your workstation.

Working around SSH issue

If you are trying this with ChefDK 0.3.6 on Ubuntu, you may encounter the following error:

         ================================================================================
         Chef encountered an error attempting to load the node data for "db"
         ================================================================================

         Unexpected Error:
         -----------------
         NoMethodError: undefined method `gsub' for nil:NilClass

This is a known issue with chef-provisioning providing a bad URL for the local-mode server. If you can upgrade to chefDK 0.4.0, this problem has been fixed (but be aware that chefDK 0.4 embeds Chef 12 and not Chef 11).

A workaround for chefDK 0.3.6 is to create the following Gemfile in your chefprov directory:

source 'https://rubygems.org'

gem 'chef-dk'
gem 'chef-provisioning'
gem 'chef-provisioning-vagrant'
gem 'net-ssh', '=2.9.1'

and then run chef-client using:

bundle exec chef-client -z vagrant_setup.rb topo.rb

This will run the chef-client using a previous version of ‘net-ssh’, which avoids the problem.

You will likely need to use ‘bundle exec’ in front of all of the chef-client runs described in this post.

UPDATE: If the above command fails with:

 
         Unexpected Error:
         -----------------
         ChefZero::ServerNotFound: No socketless chef-zero server on given port 8889

then add the following to the setup recipe:

with_chef_server "http://localhost:8889"

This problem exists with chef-dk 0.6.0 to 0.6.2.

Deploy the application

Create the following recipe to deploy the application.

vagrant_deploy.rb

require 'chef/provisioning'

myconfig = <<-EOM
  config.vm.network 'forwarded_port', guest: 3001, host: 3031
EOM

machine 'appserver' do
 add_machine_options :vagrant_config => myconfig
 run_list ['testapp::deploy']
 attribute ['testapp', 'user'], 'vagrant'
 attribute ['testapp', 'path'], '/home/vagrant'
 attribute ['testapp', 'db_location'], lazy { search(:node, "name:db").first['ipaddress'] }
end

ruby_block "print out public IP" do
 block do
   Chef::Log.info("Application can be accessed at http://localhost:3031")
 end
end

Lines 3 to 5 and 8 setup port forwarding for our application. You can see how this gets converted into a Vagrantfile by looking at what is generated in ‘~/.chef/vms/appserver.vm’.

Lines 6 to 8 setup attributes used to customize the test application. We use ‘lazy’ to ensure the IP address lookup is not done until the ‘db’ server has been created in the converge phase of the chef-client run.

Lines 11-15 print out a message so you know how to access the application.

To deploy the application, run the chef-client with the setup and deploy recipes:
chef-client -z vagrant_setup.rb vagrant_deploy.rb

When you navigate to the URL, you should see a message from the application:

 Congratulations! You have installed a test application using the knife topo plugin.

 Here are some commands you can run to look at what the plugin did:

    knife node list
    knife node show dbserver01
    knife node show appserver01
    knife node show appserver01 -a normal
    knife data bag show topologies test1
    cat cookbooks/testsys_test1/attributes/softwareversion.rb

Go to the knife-topo plugin on Github

Ignore the example commands as we did not use the knife-topo plugin.

Destroy the machines

The recipe to destroy the machines is:

destroy.rb

require 'chef/provisioning'
machine 'db' do
  :destroy
end

machine 'appserver' do
  :destroy
end

Run this using:

chef-client -z destroy.rb

If you need to clean up manually, use ‘vagrant global-status’ to get the IDs of the machines, and then use ‘vagrant destroy ‘ to destroy them. If you do this, you will also want to remove the contents of the ‘chefprov/nodes’ and ‘chefprov/clients’ directory so the local-mode server does not think they still exist.

Deploying a multi-node application to AWS using chef-provisioning

This post is for people who are getting started with chef-provisioning and want to use it to deploy to AWS. It will take you through creating a couple of machines and deploying a simple application to them. In a future post, I’ll extend this to cover setting up some networking and infrastructure (VPC, subnets, security groups), but this post will assume you are using the default VPC created by AWS.

If you’re just looking to try chef-provisioning and you use Vagrant, you may want start with my other post: Deploying a multi-node application to Vagrant using chef-provisioning.

For an overview of chef-provisioning ( (formerly known as chef-metal), take a look at this Chef-Provisioning: Infrastructure as Code blog post. Also, see the Chef provisioning docs for more details.

Getting setup with chef-provisioning

Chef-provisioning is included in the latest ChefDK (0.3.6 at time of writing). Make sure you have this version or later installed by typing:

chef --version

If not, you can download or upgrade it here.

Create a new Chef repository to explore chef-provisioning:

cd ~
chef generate repo chefprov

We are going to use chef-client in local mode to run our provisioning recipes, so we want to set up a .chef directory that will be used specifically for this repo.

cd ~/chefprov
mkdir .chef
cd .chef

In the .chef directory, create a knife.rb file containing the following:

log_level                :info
current_dir = File.dirname(__FILE__)
node_name                "provisioner"
client_key               "#{current_dir}/dummy.pem"
validation_client_name   "validator"

Our workstation is going to behave like a chef-client talking to the local-mode server on our workstation,  so it needs a node name and a key. The key can be any well-formed key as the local-mode server will not validate it. For example:

ssh-keygen -f dummy.pem

Check the setup is working by performing an empty chef-client run:

chef-client -z

This will perform a local mode chef-client run with no recipes, using the built-in chef-zero server running on port 8889. You should see output similar to:

Starting Chef Client, version 11.18.0
[2015-01-31T16:16:43-06:00] INFO: *** Chef 11.18.0 ***
[2015-01-31T16:16:43-06:00] INFO: Chef-client pid: 14113
[2015-01-31T16:16:44-06:00] INFO: Run List is []
[2015-01-31T16:16:44-06:00] INFO: Run List expands to []
[2015-01-31T16:16:44-06:00] INFO: Starting Chef Run for provisioner
[2015-01-31T16:16:44-06:00] INFO: Running start handlers
[2015-01-31T16:16:44-06:00] INFO: Start handlers complete.
[2015-01-31T16:16:44-06:00] INFO: HTTP Request Returned 404 Not Found : Object not found: /reports/nodes/provisioner/runs
[2015-01-31T16:16:44-06:00] WARN: Node provisioner has an empty run list.
Converging 0 resources
[2015-01-31T16:16:44-06:00] INFO: Chef Run complete in 0.032696323 seconds
Running handlers:
[2015-01-31T16:16:44-06:00] INFO: Running report handlers
Running handlers complete
[2015-01-31T16:16:44-06:00] INFO: Report handlers complete
Chef Client finished, 0/0 resources updated in 1.117898047 seconds

If you’re curious, take a look at the ‘nodes/provisioner.json’ file. This is where the local-mode server stores its node data. You can also run commands like:

knife node show provisioner -z

This command will query the local-mode server and show summary details that it has about your provisioner node (i.e. your workstation).

Preparing the AWS client

To use chef-provisioning, you need to have the AWS CLI client installed. Follow the AWS CLI setup instructions to download and install the client, and to obtain your access keys.

If you are using an existing AWS account, please take appropriate precautions to make sure that you are working in a ‘sandbox’ that minimizes the chance of bad things when you get a script wrong. For example, you might configure your AWS client default to use a region where you do not have existing resources. To do this, edit the ~/.aws/config file and make sure  your selected region is in the default stanza. The following example sets us-west-2 (Oregon) as the default region:

[default]
region = us-west-2

Also check that you have the right access keys are configured as default. I prefer to separate these out into the ~/.aws/credentials file, rather than put them in the config file:

[default]
aws_access_key_id = AMADEUPACCESSKEY
aws_secret_access_key = AMadeUPSecreTACcesSKEYXXYyyyZzzZ1234

To make sure the AWS client is working, run the following command:

aws ec2 describe-availability-zones

It should give you a list of availability zones in the region you are using.

If, like me, you are a little more paranoid, you may want to create an IAM user with limited access to resources. I won’t cover this in detail, but below is an example policy that may be useful as a basis to restrict access. Feel free to skip over this to the next section!

  "Version": "2012-10-17",
  "Statement": [
        {
            "Sid": "AllowDescribeAndBasicSetup",
            "Effect": "Allow",
            "Action": ["ec2:Describe*", 
                "ec2:ImportKeyPair", 
                "ec2:CreateTags", 
                "ec2:ModifyInstanceAttribute" ],
            "Resource": "*"
        },
        {
            "Sid": "AllowInstanceResourceActions",
            "Effect": "Allow",
            "Action": ["ec2:RunInstances"],
            "Resource": [
                "arn:aws:ec2:us-west-2:632055226646:instance/*",
                "arn:aws:ec2:us-west-2:632055226646:network-interface/*",
                "arn:aws:ec2:us-west-2:632055226646:subnet/*",
                "arn:aws:ec2:us-west-2:632055226646:key-pair/*",
                "arn:aws:ec2:us-west-2:632055226646:security-group/*",
                "arn:aws:ec2:us-west-2:632055226646:volume/*",
                "arn:aws:ec2:us-west-2::image/ami-*"]
        },
        {
            "Sid": "AllowOtherInstanceActions",
            "Effect": "Allow",
            "Action": [
                  "ec2:TerminateInstances",
                  "ec2:StopInstances",
                  "ec2:RebootInstances",
                  "ec2:StartInstances"],
            "Resource": "arn:aws:ec2:us-west-2:632055226646:instance/*"
        },
        {
            "Sid": "AllowToSeeWhatCantDo",
            "Effect": "Allow",
            "Action": [
                  "sts:DecodeAuthorizationMessage"],
            "Resource": "*"
        }
  ]
}

Lines 3-8 allow the user to perform most query operations on any region, import key pairs (see later section on SSH access), and create tags (which is something the chef-provisioning resources like ‘machine’ do by default).

Lines 9-21 only allow the user to create instances and associate them with resources in the us-west-2 region. Lines 22-31 allow the user to manage the instances after creation.

Lines 32-38 are optional but can be useful. If the access policy is too restrictive, you will get a ‘You are not authorized to perform this operation’ message. Sometimes this will include an encoded message which gives you information about what you were not authorized to do. With the above authorization, you can run:

aws sts decode-authorization-message --encoded-message xxxxxxxxxxxxxxxx

Where “xxxxxxxxxxxxxxxx” is the encoded message.

Preparing SSH access into AWS

In order to run chef-client on the instances that you are going to create in AWS, you need to enable SSH access to those instances. There are two main things you need to do:

  • Setup a key-pair
  • Enable SSH access from your IP address

Setup a key-pair

Use the EC2 console to create a keypair in the region you are using. Download the private key (‘test2_aws.pem’) and save it in ~/.ssh. Make sure its permissions are read-only:

chmod 400 ~/.ssh/test2_aws.pem

You will also need the public key. You can retrieve this from the private key by running:

ssh-keygen -y -f ~/.ssh/test2_aws.pem > test2_aws.pub

and giving it the name of the file.

If you are using an IAM user without a console logon, generate a keypair using ssh-keygen then import it using the AWS CLI:

aws ec2 import-key-pair --key-name test2_aws --public-key-material file://test2_aws.pub

The ‘file://’ method of loading the file ensures that the key is base64 encoded, which is required to upload a key via the CLI.

Enable SSH access from your IP address

By default, AWS does not enable SSH from external sources into its VPCs. You need to use the EC2 console to allow inbound SSH access from your IP address, by adding a rule to a security group.

This post assumes you can add this rule to the default security group for the default VPC in the region you are using. This will allow immediate access to the machines we will create with chef-provisioning.  If you can’t do this, the examples won’t work without some manual intervention – i.e. you will need to add the security group to the created instances before you can run recipes on them.

We also need to let chef-provisioning know about the keys. Add the following to your ./chef/knife.rb file:

knife[:ssh_user] = "ubuntu"
knife[:aws_ssh_key_id] = 'test2_aws'
private_keys     'test2_aws' => '/home/christine/.ssh/test2_aws.pem'
public_keys      'test2_aws' => '/home/christine/.ssh/test2_aws.pub'

Line 1 is the user name to use when SSH’ing to the instance. For the standard Ubuntu image, this should be ‘ubuntu’. Line 2 specifies which key name to use for AWS, and Lines 3 & 4 setup the locations of the private and public keys.

Enable external access to the application

Our test application requires TCP access on port 3001. Open this port by adding a Custom TCP rule to the security group for the default VPC, allowing access from any IP address (CIDR block ‘0.0.0.0/0’).

The inbound rules should now look something like this:
sgrules

Creating the AWS instances

Create basic machine provisioning recipe

Our first pass at the chef-provisioning recipes will just create the instances, with nothing on them.

We will create two recipes. The first will set up the AWS-specific details. The second will create the machines.

aws-setup.rb

require 'chef/provisioning/aws_driver'
with_driver 'aws'

  with_machine_options :bootstrap_options => {
  :key_name => 'test2_aws',
  :instance_type => 't1.micro',
  :associate_public_ip_address => true
}

Lines 4-8 specify what sort of instances we want to create.

Line 2 tells chef to use the ‘chef-provisioning-aws’ provider. This provider is one of two AWS providers distributed with ChefDK, and is an alternative to the more established chef-provisioning-fog driver. I am using it because of its support for a growing range of other AWS resources (VPCs, security groups, S3, and others). To use the fog driver, replace ‘aws’ with ‘fog:aws’. You may also need to make other changes, for example ‘:instance_type’ is ‘flavor_id’ in the fog driver.

In Line 7, we choose the smallest and cheapest type of instance to experiment with.

Line 8 associates a public IP address with the instance, so that chef can SSH to it.

We are using the default AMI, which is currently Ubuntu 14.04.

The full set of ‘:bootstrap_options’ corresponds to the options listed for the AWS create-instance method.

The second recipe specifies a simple topology with two machines in it:

topo.rb

require 'chef/provisioning'
machine 'db'
machine 'appserver'

This recipe will create and start the machines, and bootstrap the chef-client onto them.

UPDATE: chef-provisioning-aws 1.2.1 introduces new default AMIs. If the command above fails with:

AWS::EC2::Errors::InvalidParameterCombination: Non-Windows instances with a 
virtualization type of 'hvm' are currently not supported for this instance type.

then replace t1.micro with t2.micro in the above:

  with_machine_options :bootstrap_options => {
  :key_name => 'test2_aws',
  :instance_type => 't2.micro',
  :associate_public_ip_address => true
}

UPDATE: If the above command fails with:

 
         Unexpected Error:
         -----------------
         ChefZero::ServerNotFound: No socketless chef-zero server on given port 8889

then add the following to each machine resource:

machine 'db' do
  chef_server( :chef_server_url => 'http://localhost:8889') 
end
machine 'appserver' do
 chef_server( :chef_server_url => 'http://localhost:8889') 
end

or add the following in the setup recipe:

with_chef_server "http://localhost:8889"

This problem exists in chefDK 6.0 to 6.2.

Run the recipe

Before proceeding, be aware that you will be charged for the resources that these recipes create. Make sure you delete any instances after you are done. I will tell you how to do that using chef-provisioning, but I advise you to logon to the EC2 console and making sure you have no instances left running when you are done.

To run the recipes, enter:
chef-client -z aws_setup.rb topo.rb

For each of the two machines, you should see the chef-client run create a node, wait for the machine to become connectable (this may take a while), bootstrap the chef-client and perform an empty run.

If you go to the EC2 console, you should see both machines (named ‘db’ and ‘appserver’) are up and running.

Working around SSH issue

If you are trying this with ChefDK 0.3.6 on Ubuntu, you may encounter the following error:

         ================================================================================
         Chef encountered an error attempting to load the node data for "db"
         ================================================================================

         Unexpected Error:
         -----------------
         NoMethodError: undefined method `gsub' for nil:NilClass

This is a known issue with chef-provisioning providing a bad URL for the local-mode server. If you can upgrade to chefDK 0.4.0, this problem has been fixed (but be aware that chefDK 0.4 embeds Chef 12 and not Chef 11).

A workaround for chefDK 0.3.6 is to create the following Gemfile in your chefprov directory:

source 'https://rubygems.org'

gem 'chef-dk'
gem 'chef-provisioning'
gem 'chef-provisioning-aws'
gem 'net-ssh', '=2.9.1'

and then run chef-client using:

bundle exec chef-client -z aws_setup.rb topo.rb

This will run the chef-client using a previous version of ‘net-ssh’, which avoids the problem.

You will likely need to use ‘bundle exec’ in front of all of the chef-client runs described in this post.

Setup and deploy the Application

Get the application cookbooks

The basic application we will install can be found in the ‘test-repo’ for the ‘knife-topo’ plugin on Github.

First, download the latest release of  the knife-topo repository and unzip it.

Then we will use ‘berks vendor’ to assemble the cookbooks we need to deploy this application:

cd knife-topo-0.0.11/test-repo
berks vendor
cp -R berks-cookbooks/* ~/chefprov/cookbooks

Line 2 uses the Berksfile to assemble all of the necessary cookbooks into the ‘berks-cookbooks’ directory.

Line 3 copies them into our ‘chefprov’ repo, where the local-mode server will look for them when it runs the chef-provisioning recipes.

Extend machine provisioning to include runlists

Now change the topo.rb provisioning recipe as follows:

require 'chef/provisioning'

machine 'db' do
  run_list ['apt','testapp::db']
end

machine 'appserver' do
  run_list ['apt','testapp::appserver']
end

and rerun the chef-client:
chef-client -z aws_setup.rb topo.rb

This time, the chef-client running on the two instances will execute the specified recipes, installing nodejs on ‘appserver’ and mongodb on ‘db’.

Deploy the application

We will now create a third recipe to deploy the application. We could have included this as part of the ‘topo.rb’ recipe, but I chose to make it a separate recipe, so it can be run independently.

Here’s what the recipe looks like:

deploy.rb

require 'chef/provisioning'

machine 'appserver' do
 run_list ['testapp::deploy']
 attribute ['testapp', 'user'], 'ubuntu'
 attribute ['testapp', 'path'], '/var/opt'
 attribute ['testapp', 'db_location'], lazy { search(:node, "name:db").first['ipaddress'] }
end

ruby_block "print out public IP" do
 block do
 appservernode = search(:node, "name:appserver").first
 Chef::Log.info("Application can be accessed at http://#{appservernode['ec2']['public_ipv4']}:3001")
 end
end

Line 4 runs the recipe to deploy the application.

Lines 5 to 7 set attributes on the node that customize the test application. For example, Line 7 sets the attribute node[‘testapp’][‘db_location’] to the IP address of the database server, which it looks up using a search for node information stored in the local-mode Chef server (i.e. in the ‘chefprov/nodes’ directory).

In Line 5, ‘lazy’ is used so that the search occurs during the converge phase of the chef-run, not during the compile phase. This is important if the ‘topo.rb’ and ‘deploy.rb’ recipes are run in a single runlist, because the IP address of the database server will only be known after the db machine resource has actually been executed in the converge phase.

Lines 8-13 print out the URL for the application, which uses the public IP address of the application server. This is executed in a ‘ruby_block’ resource so that it occurs in the converge phase once the application server has been created and configured.

Run the chef-client:
chef-client -z aws_setup.rb deploy.rb

At the end of the run, you should see something like:

  * ruby_block[print out public IP] action run[2015-01-31T21:28:38-06:00] INFO: Processing ruby_block[print out public IP] action run (@recipe_files::/home/christine/chefprov/deploy.rb line 9)
[2015-01-31T21:28:38-06:00] INFO: Application can be accessed at https://54.67.82.204:3001
[2015-01-31T21:28:38-06:00] INFO: ruby_block[print out public IP] called

    - execute the ruby block print out public IP
[2015-01-31T21:28:38-06:00] INFO: Chef Run complete in 21.74813493 seconds

Running handlers:
[2015-01-31T21:28:38-06:00] INFO: Running report handlers
Running handlers complete
[2015-01-31T21:28:38-06:00] INFO: Report handlers complete
Chef Client finished, 2/2 resources updated in 23.594399737 seconds

Browse to the application URL, and you should see something like:

 Congratulations! You have installed a test application using the knife topo plugin.

 Here are some commands you can run to look at what the plugin did:

    knife node list
    knife node show dbserver01
    knife node show appserver01
    knife node show appserver01 -a normal
    knife data bag show topologies test1
    cat cookbooks/testsys_test1/attributes/softwareversion.rb

Go to the knife-topo plugin on Github

Ignore the example commands as we did not use the knife-topo plugin.

Destroy the machines

To destroy the machines, create a recipe:

destroy.rb

require 'chef/provisioning'
machine 'db' do
  :destroy
end

machine 'appserver' do
  :destroy
end

And run it:
chef-client -z destroy.rb

You should see messages like:

  * machine[appserver] action destroy[2015-02-01T09:20:43-06:00] INFO: Processing machine[appserver] action destroy (@recipe_files::/home/christine/chefprov/destroy.rb line 7)

    - Terminate appserver (i-93a8db50) in us-west-1 ...[2015-02-01T09:20:46-06:00] INFO: Processing chef_node[appserver] action delete (basic_chef_client::block line 26)

    - delete node appserver at http://localhost:8889[2015-02-01T09:20:46-06:00] INFO: Processing chef_client[appserver] action delete (basic_chef_client::block line 30)
[2015-02-01T09:20:46-06:00] INFO: chef_client[appserver] deleted client appserver at http://localhost:8889

    - delete client appserver at clients

For both ‘db’ and ‘appserver’. If the run succeeds but you do not see these messages, you may have specified the wrong machine name.

Until you are confident in your scripts, you may want to use the EC2 console to make sure you have terminated the instances (don’t forget to navigate to the right region). You may also want to remove the added rules from the VPC default security group.

Avoiding the possible pitfalls of derived attributes

What this post is about

This post is intended for folks who are comfortable with the basics of attributes in Chef, but want to understand some of the subtleties better. It focusses on one specific aspect – derived or computed attributes – and how to make sure they end up with the value you intend. I’m going to cover four topics:

This post is with huge thanks to the many people at the 2014 Chef Summit and online who helped me with this topic, including but not limited to Noah Kantrowski, Julian Dunn and Lamont Granquist. The good ideas are theirs, any mistakes are mine.

Attribute precedence in practice

First: it’s not all bad news. Much of the time the attribute precedence scheme in Chef 11, although complex, will do what you want it to. The complexity is there because Chef supports multiple different approaches to customizing attribute values, particularly (1) using wrapper cookbooks versus (2) using roles and environments. You can see some of these tradeoffs in this description of Chef 11 attribute changes.

Here’s a reminder of the attribute precedence scheme. The highest numbers indicate the highest precedence:


Image linked from Chef documentation.

One benefit of the above scheme is that you can override default attributes with new values in a wrapper cookbook at default level. You do not need to use a higher priority level. This is important because you can wrapper the wrapper if you have to, without suffering “attribute priority inflation”. Why wrapper a wrapper? It can be very useful when you need multiple levels of specialization, e.g. to set defaults for an organization; override some of those defaults for a business system, and then do further customizations for a specific deployment of that business system.

A benefit of the precedence scheme when working with roles and environments is that you can set default attributes in a role or environment, and they will override the default attributes in cookbooks. The mental model is that your cookbooks are designed to be generally reusable, and have the least context-awareness. An environment provides additional context such as implementing the policies specific to your organization. Similarly, roles can configure the recipes to meet a specific functional purpose.

The possible pitfalls of derived attributes

So where can it go wrong? Let’s use a simple example, consisting of a base cookbook called “app”, and a wrapper cookbook called “my_app” which has a dependency on “app” in its metadata.rb. The contents of those cookbooks are:

cookbooks/app/attributes/default.rb:

  default["app"]["name"] = "app"
  default["app"]["install_dir"] = "/var/#{node["app"]["name"]}"

-------------------------------------------------------------------------------
cookbooks/app/recipes/default.rb:

ruby_block "Executing resource in recipe" do
  block do
    Log.info "Executing recipe, app name is: #{node['app']['name']};" +
      " install_dir is #{node['app']['install_dir']}"
  end
end

------------------------------------------------------------------------------
cookbooks/my_app/attributes/default.rb:

  default["app"]["name"] = "my_app"

------------------------------------------------------------------------------
cookbooks/my_app/recipes/default.rb:

  include_recipe "app::default"

And they are uploaded to the server using:

knife cookbook upload app my_app

The base “app” cookbook has an application “name” attribute which defaults to “app”, and an “install_dir” attribute which is calcyulated from the application name. For simplicity, the recipe which would actually deploy “app” just prints out the value of the attributes using a ruby block so that we see the values that would be used when the resources are run. The wrapper “my_app” cookbook changes the application name attribute from “app” to “my_app”.

What happens if we run the wrapper cookbook?

sudo chef-client -r 'recipe[my_app]' -linfo

run1

The “name” attribute is set to “my_app”, however the derived “install_dir” attribute still has its old value of “/var/app”, which is probably not what was intended.  This is not a question of priority: if the wrapper contained override["app"]["name"] = "my_app", we would get the same result. To understand why this happens, we need to look at the order of evaluation of the attributes.

What happens during this chef-client run in this example is as follows:

  1. As there are no roles or environments, the “compile” phase starts by evaluating attribute files based on the cookbooks in the runlist and their dependencies.
  2. The first cookbook in the list is “my_app”, which has a dependency on “app”. Dependencies are loaded first, so the default “name” attribute is set to “app” and the default “install_dir” attribute is set to “/var/app”.
  3. The “my_app” wrapper attribute file is loaded second and updates the default “name” attribute to “my_app”. The “install_dir” attribute is not updated and therefore keeps its value of “/var/app”.
  4. After that, the recipe files are loaded and the ruby_block resource is added to the resource collection, instantiated with the current values of the “name” and “install_dir” attributes.
  5. The “converge” phase executes the resources in the resource collection, printing out the values “my_app” and “/var/app”.

How attribute values are determined

Basic model

The following diagrams may help explain how attribute values are evaluated.

First, let’s work with a runlist like the following, consisting of three recipes in three cookbooks (cb1, wcb, cb3). The second recipe(wcb::rc2) is a wrapper of a recipe in a fourth cookbook (cb2::r2). Each cookbook has a single attribute file (a_cb1, etc).

runlist

The diagram below illustrates how the values of the attributes in this example change through the run. The attribute files are evaluated in runlist order but with dependencies (from metadata.rb) evaluated first. In this case, ‘a_cb2’ is evaluated after ‘a_cb1’ but before ‘a_wcb’. As the attribute files are evaluated, attribute values are put into “buckets” based on the attribute name and priority, e.g. node.default['x'] updates the value of ‘x’ in the default bucket for ‘x’. Each subsequent update to the same attribute and priority replaces the value in that bucket.

compile-converge

When the recipes are run and they access an attribute e.g. node['x'], the value that is passed back is that of the highest priority bucket that has a value in it.

Here’s an example showing the problem with a derived attribute. In the first step when “y” is calculated, the value of “x” is “app” and so “y” is set to “/var/app”. The value of “x” is set to “my_app” in the second step. When recipe r2 retrieves the attribute values in the third step, it therefore gets “my_app” and “/var/app”:

eval1

This diagram shows why using a higher priority does not solve the problem. Again, “y” is calculated in the first step and “x” is not set to “my_app” until the second step:

eval2

There is a wrinkle that you should be aware of. If you chose to set “normal” precedence rather than “override” in the above, the first run would still give the same result as above, but subsequent runs would “work”. Normal attributes are special because they persist across chef-client runs. If the wrapper cookbook contained normal['x']="my_app", “y” would still be computed as “/var/app” on the first run. On the second run, however, it would change to “/var/my_app”, because “my_app” would be in the “normal” bucket at the start of evaluation and would be used in the first step to calculate “y”.

Model including roles

Roles introduce two changes to our model:

  1. Role attributes have a higher precedence than those in cookbooks, effectively creating two new rows of buckets labelled as “role_default” and “role_override” in the diagram below
  2. Role attributes are always evaluated before cookbook attributes, regardless of their runlist position

eval3

These precedence rules mean that you can use roles to avoid the derived attribute problem, as shown below:

eval3

Setting the default value of “x” to “my_app” in the role guarantees that the value of “my_app” will be present when “y” is evaluated in cookbook cb2. “my_app” will be used rather than “app” because a role default value takes precedence over the cookbook default (it is in a higher priority bucket).

Model including environments

Environments add two new precedence levels, one between default and role_default; one after role_override and before “automatic”. Like roles, they are always evaluated before cookbook attributes.

Some ways to solve the problem

As a user of a cookbook with a derived attribute

As a user of a cookbook with a derived attribute and you do not have the option of modifying the base cookbook, you have two basic choices:

  • Always set any computed attributes if you change the attributes that they are derived from
  • Use a role or environment

Set computed attributes

The simplest approach is to make sure you set all of the attributes that are derived from attributes that you want to change. In our original example, we would specify both “name” and “install_dir”, e.g.:

my_app/attributes/default.rb:

  default["app"]["name"] = "my_app"
  default["app"]["install_dir"] = "/var/my_app"

This is probably the approach you will want to take if you use the wrapper cookbook approach.

Use a role or environment

As explained in the Model including roles section, attributes in roles have priority over attributes in cookbooks, and are also always evaluated before them. If you use roles, then setting an attribute in a role will also change any computed attributes. In our original example, we could define myapp role as:

roles/myapp.json:
{
  "name": "myapp",
  "default_attributes": {
    "app": {
      "name": "my_app"
    }
  }
}

knife role from file roles/myapp.json

Then run with a modified runlist:

sudo chef-client -r 'recipe[app]','role[myapp]' -linfo

The result would be to set both the “name” attribute to “my_app”, and the “install_dir” attribute to “/var/my_app”.

As an author of a cookbook with a derived attribute

As an author of a cookbook, you may prefer not to rely on users noticing derived attributes and handling them appropriately. Here are some possibilities to make life easier for your users:

  • Use a variable and not an attribute
  • Use delayed evaluation in the recipe
  • Use conditional assignment in the recipe

A gist for this example.

Use a variable and not an attribute

If the derived value should always be calculated, then don’t use an attribute, use a ruby variable in the recipe. In our original example, if “install_dir” should always be “/var” followed by the application name, remove the derived attribute and instead do the following in the recipe:

app/attributes/default.rb:

  default["app"]["name"] = "app"

-------------------------------------------------------------------------------
app/recipes/default.rb:

install_dir = "/var/#{node["app"]["name"]}"
ruby_block "Executing resource in recipe" do
  block do
    Log.info "Executing recipe, application name is: #{node['app']['name']};" +
      " install_dir is #{install_dir}"
  end
end

Similarly, if the user needs to be able to change the root path for the install directory but the application should always be installed in a directory with the application name, create two attributes for “root_path” and “name”, and combine them using a variable:

app/attributes/default.rb:

  default["app"]["name"] = "app"
  default["app"]["root_path"] = "/var"

-------------------------------------------------------------------------------
app/recipes/default.rb:

install_dir = "#{node["app"]["root_path"]}/#{node["app"]["name"]}"
ruby_block "Executing resource in recipe" do
  block do
    Log.info "Executing recipe, application name is: #{node['app']['name']};" +
      " install_dir is #{install_dir}"
  end
end

Use delayed evaluation in the recipe

Noah Kantrowitz proposed an approach for delaying evaluation of the derived attribute into the recipe, whilst still allowing it to be defined and overridden in the attribute file.

This approach sets up a template for the derived attribute in the attribute file, using the ruby %{} operator to define a placeholder. It then uses the ruby % operator in the recipe file to perform string interpolation, i.e. to substitute the actual value of the placeholder. In our original example, this would look like:

app/attributes/default.rb:

  default["app"]["name"] = "app"
  default["app"]["install_dir"] = "/var/%{name}"

-------------------------------------------------------------------------------
app/recipes/default.rb:

install_dir = node["app"]["install_dir"] % { name: node["app"]["name"]}
ruby_block "Executing resource in recipe" do
  block do
    Log.info "Executing recipe, application name is: #{node['app']['name']};" +
      " install_dir is #{install_dir}"
  end
end

node["app"]["install_dir"] % { name: node["app"]["name"]} causes Ruby to substitute the value of the “name” attribute wherever the placeholder “%{name}” appears in the “install_dir” attribute. Because this substitution is delayed until the recipe is evaluated, the “name” attribute has already been set by the wrapper cookbook, and “install_dir” will be set to “/var/my_app”.

One consequence of this approach is that the “install_dir” attribute will have a value of “/var/%{name}” in the node object at the end of the run. This may not be desirable if “install_dir” was something you used in node searches. It also means that any cookbooks that reference the “install_dir” attribute need to perform the placeholder substitution before using it.

Use conditional assignment in the recipe

This approach is based on something suggested by Lamont Granquist. It uses conditional logic in the recipe that will only set the default value if no other value has been provided in a wrapper cookbook. Our example would look like this:

app/attributes/default.rb:

  default["app"]["name"] = "app"
  # default["app"]["install_dir"] = "/var/#{node['app']['name']" 

-------------------------------------------------------------------------------
app/recipes/default.rb:

install_dir = node["app"]["install_dir"] || "/var/#{node['app']['name']"
ruby_block "Executing resource in recipe" do
  block do
    Log.info "Executing recipe, application name is: #{node['app']['name']};" +
      " install_dir is #{install_dir}"
  end
end

The line for “install_dir” in the attribute file is commented out, so that it does not take effect but a user can see that the attribute exists and can be overridden. The line install_dir = node["app"]["install_dir"] || "/var/#{node['app']['name']" will take any overridden value of the node attribute, but otherwise will set it based on the “name” attribute. The conditional assignment is important because otherwise it would overwrite an assignment done in the wrapper cookbook.

With this code, the “install_dir” attribute saved in the node object will be null unless it has been overridden. If you want the actual value used to be saved, you may want to conditionally set the node attribute rather than a variable, e.g. node.default["app"]["install_dir"] = "/var/#{node['app']['name']" unless node["app"]["install_dir"].

Spend less time waiting, more time Cheffing

Vagrant is wonderful, but I hate waiting for my virtual machines to come up. Here’s some things I have done to reduce that wait:

Use Vagrant’s locally managed boxes

When you are starting up a machine based on a completely new box, the most painful wait is usually for the box to download. Make sure you don’t have to wait more than once: use vagrant box add to add it into vagrant’s locally managed boxes. For example, to add Ubuntu 12.04:

vagrant box add precise64 http://files.vagrantup.com/precise64.box

This will give you a box that you can now refer to as “precise64” in your Vagrantfiles. You can use whatever name you want for the first parameter (‘precise64’) in the example. The second parameter is the URL to obtain the box, see this list of base boxes.

In this example, your Vagrantfile will contain something like line 1 in the following:

  config.vm.box ="precise64";
  config.vm.box_url = "http://files.vagrantup.com/precise64.box";

Line 2 is entirely optional, and tells vagrant where to get the box if it is not found in the local cache. It’s useful for when you reuse your Vagrant file on another machine, share it with someone else, or when you forget where you got the box from!

Use vagrant-cachier with vagrant-omnibus

After storing the box locally, my next longest waiting time was for the omnibus installer to download the Chef image. I looked into how to do a knife bootstrap from a local image, but that involved replacing the entire chef bootstrap script. Matt Stratton instead pointed me at vagrant-cachier, a plugin that provides a shared package cache. You can also use it to cache other packages like apt and gems that you are installing on the virtual machine. What it does is configure the package manager to use a package cache that is a shared folder between host and guest. This cache is used by the vagrant-omnibus plugin to bootstrap chef onto the virtual machine. Make sure you have recent versions of both plugins. Here’s how to install them:

vagrant plugin install vagrant-omnibus
vagrant plugin install vagrant-cachier

It seems that vagrant-omnibus is quite specific about when it uses the cache. Here’s what worked for me.

if Vagrant.hasPlugin?("vagrant-cachier")
  config.cache.auto_detect = true
  config.cache.scope = :machine
  config.omnibus.cache_packages = true
  config.omnibus.chef_version = "11.16.0"
end

Line 1 makes sure that you dont get errors if the cachier plugin isn’t installed.

Line 2 enables caching for all types of packages. Beware of this – if you’re actually trying to test downloading from various package repositories, this setting may not work for you. I tried enabling only Chef with config.cache.auto_detect = false and config.cache.enable :chef but it seems like this doesn’t work for the omnibus installer, only for things like cookbooks that would be placed in ‘/var/chef/cache’ during a chef-client run.

Line 3 restricts package sharing to a specific machine. Although it’s tempting to use the :box setting and share across all machines using the same box, it’s dangerous (if you ever run more than one machine at once you may well get locking problems – the package managers will all treat the cache as if its a local filesystem). Further, the omnibus plugin appears to require a scope of machine before it will use the cache.

Line 4 is needed to tell omnibus that you really do want to use the cache.

Line 5 is optional and sets the specific Chef version you want to use.

With this configuration, the packages once downloaded are stored on the host machine in ‘.vagrant/machines/dbserver/cache’ (where ‘dbserver’ is the machine name in the Vagrantfile). You may need to go to this folder from time to time, to check on the cache size or to clear it out. They are shared with the guest in ‘/tmp/vagrant-cache’.

Run vbguest plugin only when needed

Plugins can make a difference to startup time. Case in point: early on I had some problems with Vagrant shared folders caused by different Guest Addition version on the guest versus Virtualbox, and so I started using the vagrant-vbguest plugin to resolve that problem. It’s great, but it takes a little while to apply the kernel updates when creating a new machine. If you are really shaving time off getting a new machine running, you may reconsider updating guest additions automatically.

Turn auto-update off for vbguest plugin

Much of the time, the mismatch between guest additions and Vagrant is not a showstopper, so you may want to start by just reporting the mismatch, i.e. turning auto_update off for the vbguest plugin (if you have it).

  config.vbguest.auto_update = false

If you decide to update guest additions, change the property in the Vagrantfile and vagrant up, or simply run:

  vagrant vbguest --do install

You are advised to reboot the virtual machine afterwards, e.g. using vagrant reload.

Remove vbguest plugin

Use vagrant plugin list to see which plugins you have, and sudo vagrant plugin remove vagrant-vbguest to remove the vbguest plugin if you have it.

Package a custom box

When I have a stable setup, I sometimes package my own box with the right version of Guest Additions and Chef. To do this, get a machine setup with the Chef and Virtual Additions that you want (plus anything else). Halt the machine, then package it as a box using something like:

vagrant package dbserver --output myprecise64.box
vagrant add myprecise64 ./myprecise64.box

Where ‘dbserver’ is the name of the machine in the Vagrantfile from which to create the box, and ‘myprecise64.box’ is the filename to output the box to. Now replace “precise64” with “myprecise64” in your Vagrantfile, and your machines will (at least for now) have the right version of Chef and Guest Additions.